Quantcast
Channel: Severalnines - ClusterControl
Viewing all 195 articles
Browse latest View live

Command Line Aficionados: Introducing s9s for ClusterControl

$
0
0

Easily Integrate ClusterControl With Your Existing DevOps Tools via s9s - Our New Command Line Interface

We’ve heard your call (and, selfishly, our own): please meet s9s - the new command line interface (CLI) for ClusterControl, our all-inclusive open source database management system.

At every conference we’ve attended so far, visitors have been asking us whether there is a command line interface for ClusterControl. And, we’re not afraid to admit, some of us at Severalnines have always wanted to have one as well. So those same colleagues have gone and created the s9s CLI for ClusterControl, which we’re happy to present today.

In fact, Johan Andersson, our CTO, is one of our command line aficionados and he describes the new CLI as follows:

What’s the ClusterControl CLI all about?

The ClusterControl CLI, is an open source project and optional package introduced with ClusterControl version 1.4.1. It is a command line tool to interact, control and manage your entire database infrastructure using ClusterControl. The s9s command line project is open source and is located on GitHub.

The ClusterControl CLI opens a new door for cluster automation where you can easily integrate it with existing deployment automation tools like Ansible, Puppet, Chef or Salt. This allows you to easily integrate scripts from your orchestration tools inside the CLI.

Users who have downloaded ClusterControl can use the CLI for all the ClusterControl features while they’re on the Enterprise trial of ClusterControl. Community users can then use the deployment and monitoring functionalities of ClusterControl. Existing customers can use the CLI to the full extent of ClusterControl.

Usage and Installation

The CLI can be installed by adding the s9s tools repository and using a package manager, as well as be compiled from source. The current installation script to install ClusterControl, install-cc, will automatically install the command line client. The command line client can also be installed on another computer or workstation for remote management. Finally, the CLI requires ClusterControl 1.4.1 or later.

Moreover, all communication between the client and the controller is encrypted and secured using TLS.

The ClusterControl CLI allows you to deploy and manage open source databases and load balancers in a way that is fully integrated and aligned with the ClusterControl core and GUI.

The s9s command line project is open source and located on GitHub: https://github.com/severalnines/s9s-tools

For examples and additional information, e.g, how to setup users and authentication, please visit
https://severalnines.com/docs/components.html#clustercontrol-cli

Before you get started, you need to have ClusterControl version 1.4.1 or later installed, see https://severalnines.com/download-clustercontrol-database-management-system

Some of the things you can do from the CLI in ClusterControl

  • Deploy and manage database clusters
    • MySQL
    • PostgreSQL
    • MongoDB to be added soon
  • Monitor your databases
    • Status of nodes and clusters
    • Cluster properties can be extracted
    • Gives detailed enough information about your clusters
  • Manage your systems and integrate with DevOps tools
    • Create, stop or start clusters
    • Add, remove, or restart nodes in the cluster
    • Create database users (CREATE USER, GRANT privileges to user)
      • Users created in the CLI are traceable through the system
    • Create load balancers (HAProxy, ProxySQL)
    • Create and Restore backups
    • Use maintenance mode
    • Conduct configuration changes of db nodes
    • Integrate with existing deployment automation
      • Ansible, Puppet, Chef or Salt, ...

Actions you take from the CLI will be visible in the ClusterControl Web UI and vice versa.

How to contribute

The CLI project (aka s9s-tools) can be accessed via GitHub. We encourage users to contribute to the project by:

  • Trying out the CLI and give us feedback
  • Letting us know about missing features, wishes, or problems by opening issues on GitHub
  • Contributing patches to the project

To sum things up

The ClusterControl CLI and GUI are fully integrated and synced to allow you to utilize the CLI for deployment and management of your databases and load balancers, whilst using the advanced graphs in the GUI for monitoring and troubleshooting. The CLI offers detailed information about node stats and cluster stats, enabling scripts and other tools to benefit from those.

In our experience, System Administrators and DevOps professionals are the mostly likely to benefit from a CLI for ClusterControl as they are accustomed to using scripts to perform their daily tasks.

Happy command-line-clustering!


Webinar - How to use ClusterControl from the command line and integrate with your DevOps tools

$
0
0

Join us for our new webinar on “How to use ClusterControl from the command line” on Tuesday, May 30th!

In this webinar we will walk you through the ClusterControl command line toolset capabilities and demonstrate its main functions and DevOps integration aspects.

How to use ClusterControl from the command line

The Severalnines command line interface offers an open source alternative for the web based ClusterControl User Interface on the command line. You can perform almost any deployment, management or scaling task from the command line; any changes made are also visible in the web UI and vice versa.

The command line client opens up many possibilities to integrate ClusterControl into your infrastructure or development cycle. You can integrate the client easily with existing deployment automation tools like Ansible, Puppet and Chef. You will be able to enrich your existing chatbot to interface with ClusterControl or make use of Severalnines’ chatbot called CCBot. The command line client can also create output in various formats, including json, to make integration with any framework easy.

Sign up below!

Date, Time & Registration

Europe/MEA/APAC

Tuesday, May 30th at 09:00 GMT / 10:00 CET (Germany, France, Sweden)

Register Now

North America/LatAm

Tuesday, May 30th at 09:00 Pacific Time (US) / 12:00 Eastern Time (US)

Register Now

Agenda

  • What is the ClusterControl command line client?
  • How to install the command line client
  • How to use the command line client
  • Integration possibilities
  • How you can contribute to the command line client
  • Live Demo

With new installations from ClusterControl 1.4.1 onwards the Severalnines ClusterControl command line interface will be installed by default. You will be able to install the command line manually and use it with existing ClusterControl installations up from version 1.4.1.

To ensure your command line client is secure, we use are using TLS between the client and the ClusterControl backend. This ensures all your commands, jobs and stats will be transported and executed securely.

Speakers

Johan Andersson, CTO, Severalnines

Johan's technical background and interest are in high performance computing as demonstrated by the work he did on main-memory clustered databases at Ericsson as well as his research on parallel Java Virtual Machines at Trinity College Dublin in Ireland. Prior to co-founding Severalnines, Johan was Principal Consultant and lead of the MySQL Clustering & High Availability consulting group at MySQL / Sun Microsystems / Oracle, where he designed and implemented large-scale MySQL systems for key customers. Johan is a regular speaker at MySQL User Conferences as well as other high profile community gatherings with popular talks and tutorials around architecting and tuning MySQL Clusters.

Art van Scheppingen, Senior Support Engineer, Severalnines

Art van Scheppingen is a Senior Support Engineer at Severalnines. He’s a pragmatic database expert with over 16 years experience in web development. He previously worked at Spil Games as Head of Database Engineering, where he kept a broad vision upon the whole database environment: from MySQL to MongoDB, Vertica to Hadoop and from Sphinx Search to SOLR. He regularly presents his work and projects at various conferences (Percona Live, MongoDB Open House, FOSDEM) and related meetups.

We look forward to “seeing” you there!

How to use s9s -The Command Line Interface to ClusterControl

$
0
0

s9s is our official command line tool to interact with ClusterControl. We’re pretty excited about this, as we believe its ease of use and script-ability will make our users even more productive. Let’s have a look at how to use it. In this blog, we’ll show you how to use s9s to deploy and manage your database clusters.

ClusterControl v1.4.1 comes with an optional package called s9s-tools, which contains a binary called "s9s". As most of you already know, ClusterControl provides a graphical user interface from where you can deploy, monitor and manage your databases. The GUI interacts with the ClusterControl Controller (cmon) via an RPC interface. The new CLI client is another way to interact with the RPC interface, by using a collection of command line options and arguments. At the time of writing, the CLI has support for a big chunk of the ClusterControl functionality and the plan is to continue to build it out. Please refer to ClusterControl CLI documentation page for more details. It is worth mentioning that the CLI is open source, so it is possible for anybody to add functionality to it.

As a side note, s9s is the backbone that drives the automatic deployment when running ClusterControl and Galera Cluster on Docker Swarm as shown in this blog post. You should take note that this tool is relatively new and comes with some limitations like different user management module and no support for Role Based Access Control.

Setting up the Client

Starting from version 1.4.1, the installer script will automatically install this package on the ClusterControl node. You can also install it on another computer or workstation to manage the database cluster remotely. All communication is encrypted and secure through SSH.

In this example, the client will be installed on another workstation running on Ubuntu. We are going to connect to the ClusterControl server remotely. Here is the diagram to illustrate this:

We have covered the installation and configuration steps in the documentation. Ensure you perform the following steps:

  1. On the ClusterControl host, ensure it runs on ClusterControl Controller 1.4.1 and later.
  2. On the ClusterControl host, ensure CMON RPC interface (port 9500 and 9501) is listening to an IP address that is routable to external network. Follow these steps.
  3. Install s9s-tools package on the workstation. Follow these installation steps.
  4. Configure the Remote Access. Follow these steps.

Take note that it is also possible to build the s9s command line client on other Linux distribution and Mac OS/X as described here. The command line client installs manual pages and can be viewed by entering the command:

$ man s9s

Deploy Everything through CLI

In this example, we are going to perform the following operations with the CLI:

  1. Deploy a three-node Galera Cluster
  2. Monitor state and process
  3. Create schema and user
  4. Take backups
  5. Cluster and node operations
  6. Scaling up/down

Deploy a three-node Galera Cluster

First, on the ClusterControl host, ensure we have setup passwordless SSH to all the target hosts:

(root@clustercontrol)$ ssh-copy-id 10.0.0.3
(root@clustercontrol)$ ssh-copy-id 10.0.0.4
(root@clustercontrol)$ ssh-copy-id 10.0.0.5

Then, from the client workstation:

(client)$ s9s cluster --create --cluster-type=galera --nodes="10.0.0.3;10.0.0.4;10.0.0.5"  --vendor=percona --provider-version=5.7 --db-admin-passwd="mySecr3t" --os-user=root --cluster-name="PXC_Cluster_57" --wait

We defined “--wait” which means the job will run in the foreground and wait for the job to complete. It will return 0 for a successful job or non-zero if the job fails. To let this process run as a background job, just omit this flag.

Then, you should see the progress bar:

Create Galera Cluster
\ Job  1 RUNNING    [▊       ]  26% Installing MySQL on 10.0.0.3

The same progress can be monitored under Activity (top menu) of the ClusterControl UI:

Notice that the job was initiated by user 'dba', which is our command line remote user.

Monitor state and process

There are several ways to look for the cluster. You can simply list out the cluster with --list:

$ s9s cluster --list --long
ID STATE   TYPE   OWNER GROUP NAME           COMMENT
 1 STARTED galera dba   users PXC_Cluster_57 All nodes are operational.
Total: 1

Also, there is another flag called --stat for a more detailed summary:

$ s9s cluster --stat
    Name: PXC_Cluster_57                      Owner: dba/users
      ID: 1                                   State: STARTED
    Type: GALERA                             Vendor: percona 5.7
  Status: All nodes are operational.
  Alarms:  0 crit   1 warn
    Jobs:  0 abort  0 defnd  0 dequd  0 faild  2 finsd  0 runng
  Config: '/etc/cmon.d/cmon_1.cnf'

Take note that you can use cluster ID or name value as the identifier when manipulating our Galera Cluster. More examples further down.

To get an overview of all nodes, we can simply use the “node” command option:

$ s9s node --list --long
ST  VERSION         CID CLUSTER        HOST      PORT COMMENT
go- 5.7.17-13-57      1 PXC_Cluster_57 10.0.0.3  3306 Up and running
go- 5.7.17-13-57      1 PXC_Cluster_57 10.0.0.4  3306 Up and running
go- 5.7.17-13-57      1 PXC_Cluster_57 10.0.0.5  3306 Up and running
co- 1.4.1.1834        1 PXC_Cluster_57 10.0.0.7  9500 Up and running
go- 10.1.23-MariaDB   2 MariaDB_10.1   10.0.0.10 3306 Up and running
go- 10.1.23-MariaDB   2 MariaDB_10.1   10.0.0.11 3306 Up and running
co- 1.4.1.1834        2 MariaDB_10.1   10.0.0.7  9500 Up and running
gr- 10.1.23-MariaDB   2 MariaDB_10.1   10.0.0.9  3306 Failed
Total: 8

s9s allows you to have an aggregated view of all processes running on all nodes. It can be represented in a real-time format (similar to ‘top’ output) or one-time format (similar to ‘ps’ output). To monitor live processes, you can do:

$ s9s process --top --cluster-id=1
PXC_Cluster_57 - 04:27:12                                           All nodes are operational.
4 hosts, 16 cores,  6.3 us,  0.7 sy, 93.0 id,  0.0 wa,  0.0 st,
GiB Mem : 14.8 total, 2.9 free, 4.6 used, 0.0 buffers, 7.2 cached
GiB Swap: 7 total, 0 used, 7 free,

PID   USER   HOST     PR  VIRT      RES    S   %CPU   %MEM COMMAND
 4623 dba    10.0.0.5 20  5700352   434852 S  20.27  11.24 mysqld
 4772 dba    10.0.0.4 20  5634564   430864 S  19.99  11.14 mysqld
 2061 dba    10.0.0.3 20  5780688   459160 S  19.91  11.87 mysqld
  602 root   10.0.0.7 20  2331624    38636 S   8.26   1.00 cmon
  509 mysql  10.0.0.7 20  2613836   163124 S   0.66   4.22 mysqld
...

Similar to top command, you can get a real-time summary for all nodes under this cluster. The first line tells us the cluster name, current time and the cluster state. The second, third and fourth lines are accumulated resources of all nodes in the cluster combined. In this example, we used 4 hosts (1 ClusterControl + 3 Galera), each has 4 cores, ~4 GB RAM and around 2GB swap.

To list out processes (similar to ps output) of all nodes for cluster ID 1, you can do:

$ s9s process --list --cluster-id=1
PID   USER   HOST     PR  VIRT      RES    S   %CPU   %MEM COMMAND
 2061 dba    10.0.0.3 20  5780688   459160 S  25.03  11.87 mysqld
 4623 dba    10.0.0.5 20  5700352   434852 S  23.87  11.24 mysqld
 4772 dba    10.0.0.4 20  5634564   430864 S  20.86  11.14 mysqld
  602 root   10.0.0.7 20  2331624    42436 S   8.73   1.10 cmon
  509 mysql  10.0.0.7 20  2613836   173688 S   0.66   4.49 mysqld
...

You can see there is another column called “HOST”, which represents the host where the process is running. This centralized view approach will surely save you time, so you do not have to get individual outputs for each node and then compare them.

Create database schema and user

Now we know our cluster is ready and healthy. We can then create a database schema:

$ s9s cluster --create-database --cluster-name='PXC_Cluster_57' --db-name=db1
Database 'db1' created.

The command below does the same thing but using the cluster ID as the cluster identifier instead:

$ s9s cluster --create-database --cluster-id=1 --db-name=db2
Database 'db2' created.

Then, create a database user associated with this database together with proper privileges:

$ s9s cluster --create-account --cluster-name='PXC_Cluster_57' --account='userdb1:password@10.0.0.%' --privileges='db1.*:SELECT,INSERT,UPDATE,DELETE,INDEX,CREATE'
Account 'userdb1' created.
Grant processed: GRANT SELECT, INSERT, UPDATE, DELETE, INDEX, CREATE ON db1.* TO 'userdb1'@'10.0.0.%'

You can now import or start to work with the database.

Take backups with mysqldump and Xtrabackup

Creating a backup is simple. You just need to decide which node to backup and the backup method. The storage location by default will be located on the controller node, unless you specify the --on-node flag. If the backup destination directory does not exist, ClusterControl will create it for you.

Backup completion time varies depending on the database size. It’s good to let the backup job run in the background:

$ s9s backup --create --backup-method=mysqldump --cluster-id=1 --nodes=10.0.0.5:3306 --backup-directory=/storage/backups
Job with ID 4 registered.

The ID for the backup job is 4. We can list all jobs by simply listing them out:

$ s9s job --list
ID CID STATE    OWNER  GROUP  CREATED  RDY  COMMENT
 1   0 FINISHED dba    users  06:19:33 100% Create Galera Cluster
 2   1 FINISHED system admins 06:33:48 100% Galera Node Recovery
 3   1 FINISHED system admins 06:36:04 100% Galera Node Recovery
 4   1 RUNNING3 dba    users  07:21:30   0% Create Backup
Total: 4

The job list tells us that there is a running job with state RUNNING3 (job is running on thread #3). You can then attach to this job if you would like to monitor the progress:

$ s9s job --wait --job-id=4
Create Backup
\ Job  4 RUNNING3   [    █     ] ---% Job is running

Or, inspect the job messages using the --log flag:

$ s9s job --log --job-id=4
10.0.0.5:3306: Preparing for backup - host state (MYSQL_OK) is acceptable.
10.0.0.7: creating backup dir: /storage/backups/BACKUP-1
10.0.0.5:3306: detected version 5.7.17-13-57.
Extra-arguments be passed to mysqldump:  --set-gtid-purged=OFF
10.0.0.7: Starting nc -dl 9999 > /storage/backups/BACKUP-1/mysqldump_2017-05-09_072135_mysqldb.sql.gz 2>/tmp/netcat.log.
10.0.0.7: nc started, error log: 10.0.0.7:/tmp/netcat.log.
Backup (mysqldump, storage controller): '10.0.0.5: /usr/bin/mysqldump --defaults-file=/etc/my.cnf --flush-privileges --hex-blob --opt   --set-gtid-purged=OFF  --single-transaction --skip-comments --skip-lock-tables --skip-add-locks --databases mysql |gzip  - | nc 10.0.0.7 9999'.
10.0.0.5: MySQL >= 5.7.6 detected, enabling 'show_compatibility_56'
A progress message will be written every 1 minutes
...

The same applies to xtrabackup. Just change the backup method accordingly. The supported values are xtrabackupfull (full backup) and xtrabackupincr (incremental backup):

$ s9s backup --create --backup-method=xtrabackupfull --cluster-id=1 --nodes=10.0.0.5:3306 --backup-directory=/storage/backups
Job with ID 6 registered.

Take note that an incremental backup requires that there is already a full backup made of the same databases (all or individually specified), else the incremental backup will be upgraded to a full backup.

You can then list out the backups created for this cluster:

$ s9s backup --list --cluster-id=1 --long --human-readable
ID CID STATE     OWNER HOSTNAME CREATED  SIZE FILENAME
 1   1 COMPLETED dba   10.0.0.5 07:21:39 252K mysqldump_2017-05-09_072135_mysqldb.sql.gz
 1   1 COMPLETED dba   10.0.0.5 07:21:43 1014 mysqldump_2017-05-09_072135_schema.sql.gz
 1   1 COMPLETED dba   10.0.0.5 07:22:03 109M mysqldump_2017-05-09_072135_data.sql.gz
 1   1 COMPLETED dba   10.0.0.5 07:22:07  679 mysqldump_2017-05-09_072135_triggerseventsroutines.sql.gz
 2   1 COMPLETED dba   10.0.0.5 07:30:20 252K mysqldump_2017-05-09_073016_mysqldb.sql.gz
 2   1 COMPLETED dba   10.0.0.5 07:30:24 1014 mysqldump_2017-05-09_073016_schema.sql.gz
 2   1 COMPLETED dba   10.0.0.5 07:30:44 109M mysqldump_2017-05-09_073016_data.sql.gz
 2   1 COMPLETED dba   10.0.0.5 07:30:49  679 mysqldump_2017-05-09_073016_triggerseventsroutines.sql.gz

Omit the “--cluster-id=1” option and to see the backup records for all your clusters.

Cluster and node operations

Performing a rolling restart (one node at a time) can be done with a single command line:

$ s9s cluster --rolling-restart --cluster-id=1 --wait
Rolling Restart
| Job  9 RUNNING    [███       ]  31% Stopping 10.0.0.4

For configuration management, we can get a list of configuration options defined inside a node’s my.cnf, and pipe the stdout to grep for filtering:

$ s9s node --list-config --nodes=10.0.0.3 | grep max_
MYSQLD      max_heap_table_size                    64M
MYSQLD      max_allowed_packet                     512M
MYSQLD      max_connections                        500
MYSQLD      wsrep_max_ws_rows                      131072
MYSQLD      wsrep_max_ws_size                      1073741824
mysqldump   max_allowed_packet                     512M

Let’s say we would like to reduce the max_connections. Then, we can use the “node” command option to perform the configuration update as shown in the following example:

$ s9s node --change-config --nodes=10.0.0.3 --opt-group=mysqld --opt-name=max_connections --opt-value=200
Variable 'max_connections' set to '200' and effective immediately.
Persisted change to configuration file /etc/my.cnf.
$ s9s node --change-config --nodes=10.0.0.4 --opt-group=mysqld --opt-name=max_connections --opt-value=200
Variable 'max_connections' set to '200' and effective immediately.
Persisted change to configuration file /etc/my.cnf.
$ s9s node --change-config --nodes=10.0.0.5 --opt-group=mysqld --opt-name=max_connections --opt-value=200
Variable 'max_connections' set to '200' and effective immediately.
Persisted change to configuration file /etc/my.cnf.

As stated in the job response, the changes are effective immediately. So it is not necessary to perform a node restart.

Scaling up and down

Adding a new database node is simple. First, setup a passwordless SSH to the new node:

(clustercontrol)$ ssh-copy-id 10.0.0.9

Then, specify the node’s IP address or hostname together with the cluster identifier (assume we want to add the node into a cluster with ID=2):

(client)$ s9s cluster --add-node --nodes=10.0.0.9 --cluster-id=2 --wait
Add Node to Cluster
| Job  9 FINISHED   [██████████] 100% Job finished.

To remove a node, one would do:

$ s9s cluster --remove-node --nodes=10.0.0.9 --cluster-id=2
Job with ID 10 registered.

Summary

ClusterControl CLI can be nicely integrated with your infrastructure automation tools. It opens a new way to interact and manipulate your databases. It is completely open source and available on GitHub. Go check it out!

Database Automation: Integrating the ClusterControl CLI with your ChatBot

$
0
0

Last year we launched a ClusterControl integration with chatrooms. We made a Hubot based chatbot, called CCBot, to make your database tier accessible from your company wide chat! The chatbot integrates our CMON backend API within the Hubot framework, and this opened up the ability to interact with ClusterControl via the chatbot. This could be very beneficial for companies that rely on close collaboration between development and operations, like DevOps, as this enables all users in the same chatroom to use the same interface to the company’s database infrastructure.

With the availability of the ClusterControl command line client (CLI), we also have a new and improved CCBot, that has a full integration with the CLI. That means that any functionality present in the CLI is also available in your CCBot enabled chat!

Installing CCBot

The CCBot installation is a straightforward installation that we described in our CCBot introductory blog post. CCBot depends on the Hubot framework, which in itself depends on Node.js. Once Node.js has been installed and the CCBot has been checked out from the public CCBot Github repository, all other dependencies will be resolved automatically by npm. The newly added CLI support will be immediately available as well.

Installing the ClusterControl CLI

The ClusterControl CLI will automatically be installed on new installations of ClusterControl 1.4.1 and higher. You can also install it manually on remote hosts (other than the ClusterControl node).On the Severalnines Command Line Interface GitHub repository you can find installation instructions for your specific operating system. Note that the CLI is compatible with version 1.4.1 and up.

After installing the command line interface, a new user has to be created for CCBot under the user that runs CCBot. This really depends on how you have set up your hubot environment, but typically is the root user. This user will then be used by CCBot to interact with ClusterControl via the CLI. An existing user can be reused, however it will be easier to revoke access from a separate CCBot user.

To create the user, use the following command:

s9s user --create --cmon-user=ccbot --generate-key --controller="https://localhost:9501"

Then after creating the user we need to modify the config file in .s9s/s9s.conf in the homedir of the user that runs Hubot. Modify this file and set the controller_host_name that runs the ClusterControl backend cmon. If you have installed CCBot on the same host as ClusterControl this will be localhost, otherwise you need to sepecify the hostname of the ClusterControl host. Also set the controller_port to 9501 and enable rpc_tls.

[global]
cmon_user=ccbot
controller_host_name = localhost
controller_port      = 9501
rpc_tls              = true

With this command you can verify if the command line client works under the hubot user:

[hubot@n1 ~]$ s9s cluster --list

The output should look similar to this:

If the output is similar to the picture below, the .s9s directory hasn’t been created or Hubot is running under a different user than you have created the user with.

Interacting with ClusterControl via CCBot and CLI

If you are unsure how to use a command, you can always invoke the command line client help by adding --help. For example:

art [4:14 PM] @ccbot s9s --help
ccbot [4:14 PM] Running [s9s --help]...
Usage:
  s9s COMMAND [OPTION...]

Where COMMAND is:
   backup - to view, create and restore database backups.
  cluster - to list and manipulate clusters.
…
Job related options:
  --wait                     Wait until the job ends.
  --log                      Wait and monitor job messages.
  --schedule=DATE&TIME       Run the job at the specified time.

And if you wish to have command related help, you simple add --help after your command:

art [4:14 PM] @ccbot s9s cluster --help
ccbot [4:14 PM] Running [s9s cluster --help]...
Usage:
  s9s COMMAND [OPTION...]
…
Options for the "maintenance" command:
  --list                     List the maintenance period.
  --create                   Create a new maintenance period.
  --delete                   Delete a maintenance period.

  -u, --cmon-user=USERNAME   The username on the Cmon system.
  --cluster-id=ID            The cluster for cluster maintenances.
  --nodes=NODELIST           The nodes for the node maintenances.
  --full-uuid                Print the full UUID.
  --start=DATE&TIME          The start of the maintenance period.
  --end=DATE&TIME            The end of the maintenance period.
  --reason=STRING            The reason for the maintenance.
  --date-format=FORMAT       The format of the dates printed.
  --uuid=UUID                The UUID to identify the maintenance period.

So now we will give a few examples on how to use the command line client with CCBot. Here is how to create a new cluster:

art [4:15 PM] @ccbot s9s cluster --create --cluster-type=galera --vendor=percona --provider-version=5.7 --db-admin-passwd='pa$$word' --os-user=vagrant --cluster-name='galera01' --nodes="10.10.37.11;10.10.37.12"
ccbot [4:14 PM] Running [s9s cluster --create --cluster-type=galera --vendor=percona --provider-version=5.7 --db-admin-passwd='pa$$word' --os-user=vagrant --cluster-name='galera01' --nodes="10.10.37.11;10.10.37.12"]...
Job with ID 1 registered.

After we have created the new cluster deployment, we can keep track of its progress by requesting the output from the jobs:

art [4:16 PM] @ccbot s9s job --list
ccbot [4:16 PM] Running [s9s job --list]...
ID CID STATE    OWNER  GROUP  CREATED             RDY  TITLE
 1   0 RUNNING  ccbot  users  2017-05-11 11:30:54 100% Create Galera Cluster

And if we wish to see this job in detail, we can request this from CCBot as well:

art [4:16 PM] @ccbot s9s job --log --job-id=1
ccbot [4:16 PM] Running [s9s job --log --job-id=1]...
Calling job: setupServer(10.10.37.11:3306).
10.10.37.11: Check and disable AppArmor.
10.10.37.11: Checking SELinux status (enabled = false).
...
Wait for a synced node (timeout: 360 sec)
Found a SYNCED galera node: 10.10.37.11:3306
Collecting config files from all nodes
Job finished, all the nodes have been added successfully.

After the job has deployed the new cluster, we can list the cluster:

art [4:19 PM] @ccbot s9s cluster --list
ccbot [4:19 PM] Running [s9s job cluster --list]...
galera01

And if we need to see the details of the cluster, we can retrieve the current stats for the cluster:

art [4:19 PM] @ccbot s9s cluster --stat --cluster-id=1
ccbot [4:19 PM] Running [s9s job cluster --stat --cluster-id=1]...
 galera01                                                                                                                                                                                                  Name: galera01                            Owner: ccbot/users
      ID: 1                                   State: STARTED
    Type: GALERA                             Vendor: percona 5.7
  Status: All nodes are operational.
  Alarms:  1 crit   4 warn
    Jobs:  0 abort  0 defnd  0 dequd  0 faild  7 finsd  0 runng
  Config: '/etc/cmon.d/cmon_1.cnf'
 LogFile: '/var/log/cmon_1.log'

We can also scale the cluster by adding one additional node:

art [4:20 PM] @ccbot s9s cluster --add-node --nodes="10.10.37.13" --cluster-id=1
ccbot [4:20 PM] Running [s9s cluster --add-node --nodes="10.10.37.13" --cluster-id=1]...
Job with ID 2 registered.

And to remove the very same node, if we just made a mistake adding it in the first place:

art [4:22 PM] @ccbot s9s cluster --remove-node --nodes="10.10.37.13" --cluster-id=1
ccbot [4:22 PM] Running [s9s cluster --remove-node --nodes="10.10.37.13" --cluster-id=1]...
Job with ID 3 registered.

Scheduling a backup also has become a simple one liner:

art [4:14 PM] @ccbot s9s backup --create --cluster-id=1 --nodes="10.10.37.12"
--backup-directory="/backups/"
ccbot [4:22 PM] Running [s9s backup --create --cluster-id=1 --nodes="10.10.37.12"
--backup-directory="/backups/"]...
Job with ID 11 registered.

Boundaries of the CLI

There are a couple of caveats with using the command line interface under the Hubot framework. First of all, there is no support for webhooks with the CLI. Normally you would use this to send commands or status updates from an external source to a Hubot based chatbot. Since the command line interface is decoupled from CCBot and keeps no state, it will be difficult to integrate webhooks for this functionality. This means all status updates need to be requested from ClusterControl using the job list command.

Also in the initial version of CCBot, we added the ability to run backups. Once a backup had been scheduled as a job, a new thread would be started to monitor the progress of the (backup) job and report updates back (privately) to the user who initiated the backup. The command to do this is still available in CCBot and fully functional. However if a backup gets started via CLI, no new thread will be started as it has been started using the command line. This means the user initiating the backup will not get direct feedback and has to request status updates via the command line client.

Another limitation is that the CLI has been implemented as a single command. This means that if you integrate CCBot in an existing chatbot with user authorization, it would be difficult to disallow certain specific commands that you would send to the command line client. Depending on your needs, you would be able to create additional proxy commands for the CLI and allow/disallow them per user.

These boundaries are present in this initial launch of the CCBot CLI version, but we are working hard to overcome them in the next version.

Conclusion

The command line client is really easy to use, and if you are very accustomed to the command line of your own operating system, it will be a great addition. However not everyone has access to the hosts with the command line client installed, and allowing external connections sending commands to ClusterControl may not be in the best of interest in terms of security. The addition of the command line client to our chatbot, CCBot, will open up the command line client for users that do not work regularly with a command line. It allows them to send commands to ClusterControl that these users normally wouldn’t have had access to. We’d love to hear your thoughts on this.

Video: ClusterControl Command Line Client (CLI) Product Demonstration

$
0
0

The video below details the features and functions that are available in the new ClusterControl Command Line Client (CLI) Included in the video are…

  • Overview of the Command Line Interface
  • Installation of the CLI
  • Authentication & Security
  • Benefits of using the CLI
  • Context-based help through the CLI
  • Deploying new clusters
  • Viewing status of new clusters via CLI
  • Creating a database user
ClusterControl
Single Console for Your Entire Database Infrastructure
Find out what else is new in ClusterControl

ClusterControl Command Line Client (CLI)

Included in the latest release of ClusterControl is the new Command Line Interface (CLI), which allows users to perform most of the functions available within ClusterControl using simple commands. Used in conjunction with the powerful GUI, it gives users alternative ways to manage their open source database environments using whatever engine they prefer.

The ClusterControl CLI allows users who prefer not to manage their databases through a GUI to have an alternative method to deploy and manage their databases, while still benefiting from the advanced automation and management features found in ClusterControl. All actions, such as deploying a cluster, using the CLI will be visible in the UI and vice versa.

The new CLI allows you to…

  • Deploy and manage database clusters
    • MySQL
    • PostgreSQL
  • Monitoring Features
    • Status of nodes and clusters
    • Cluster properties can be extracted
  • Management features
    • Create clusters
    • Stop or start clusters
    • Add or remove nodes
    • Restart nodes in the cluster
    • Create database users (CREATE USER, GRANT privileges to user)
    • Create load balancers (HAProxy, ProxySQL.)
    • Create and Restore backups
    • Enable maintenance mode.
    • Configuration changes of db nodes

Learn more about the new ClusterControl CLI check it out here.

Using the Galera Replication Window advisor to avoid SST

$
0
0

Galera clustering replicates data between nodes synchronously. This way, all nodes in the cluster ensure data is consistent between each other. But what happens if one of those nodes leaves the cluster for a short period of time? This could happen for instance if you are taking a node down for maintenance, have a power outage in one rack or if network partitioning happens.

Galera provides a mechanism for this: once the node joins the cluster it will request an Incremental State Transfer (IST) from the cluster. This IST contains all transactions that were executed during the time the node wasn’t part of the cluster. If the node was away for too long, the IST will not contain all necessary transactions and the node will request a State Snapshot Transfer (SST). A SST is basically a full synchronization of the dataset of one of the nodes in the cluster. In ClusterControl, we configure the SST to be provided by Xtrabackup, but you could also use mysqldump or rsync as method.

During the SST the joining node will be unavailable for queries. Naturally the larger your dataset, the longer it takes to send the SST from one node to another. This means your cluster will not be in sync for a longer period of time, so avoiding the SST is one of the most important things in a Galera cluster!

Galera gcache and the Replication Window

The IST is provided by entries in the Galera gcache. The gcache is a circular buffer file (ringbuffer) acting as a temporary storage for all transactions executed on the Galera node. Once the ringbuffer is full, Galera will evict the oldest transactions from this file. The time between the first and last entry in the gcache can be referred to as the replication window. Also transactions that are too large to store in the file will be stored in a separate file on disk.

You can configure the size of the gcache using the gcache.size directive inside the wsrep_provider_options, and this is set to 128MB by default. You can read our Galera gcache blog post if you wish to know more about it and how to configure it. You can also read our blog post about determining the optimal size for the gcache setting.

If you are familiar with the MongoDB, you may have noticed a similarity between the Galera gcache and the MongoDB oplog. Similar to the gcache, the oplog is a circular buffer that contains all transactions executed on the master. There is a major difference though: in contrary to the persistence of the oplog, the gcache file will be removed and recreated everytime MySQL starts. Also the oplog facilitates a method of determining the replication window, while gcache does not.

ClusterControl advisor for Galera replication window

With this blog post we want to bring to your attention our new Galera replication window advisor. This advisor, which we created in the developer studio, will constantly analyze your write workload and determine if the Galera gcache is still sufficient to sustain a desired replication window. We can only make an estimation of the replication window, as the gcache file does not give us information of the actual contents of the gcache file.

Instead of this we calculate the write rate per second of Galera in short and long term:

write_rate = (received_bytes + replicated_bytes) / time;

With the write rate per second, we can calculate how much storage we would need to satisfy a certain replication window. If the current write rate does not sustain the desired replication window, we can now preemptively warn the user.

Conclusion

In the past, someone determined the gcache size of their Galera cluster. Even though this gcache size might have been valid when the cluster was initially deployed, this may not be valid anymore for their current write workload. With this new advisor, we can give our users the benefit of continuously reviewing their gcache size.

You can download our new advisor directly from our advisors repository on Github, or wait for it to be included in the next version of ClusterControl. Let us know if you would like any assistance on how to write these advisors using our developer studio, we’d be happy to help!

MySQL on Docker: Running Galera Cluster on Kubernetes

$
0
0

In the last couple of blogs, we covered how to run a Galera Cluster on Docker, whether on standalone Docker or on multi-host Docker Swarm with overlay network. In this blog post, we’ll look into running Galera Cluster on Kubernetes, an orchestration tool to run containers at scale. Some parts are different, such as how the application should connect to the cluster, how Kubernetes handles failover and how the load balancing works in Kubernetes.

Kubernetes vs Docker Swarm

Our ultimate target is to ensure Galera Cluster runs reliably in a container environment. We previously covered Docker Swarm, and it turned out that running Galera Cluster on it has a number of blockers, which prevent it from being production ready. Our journey now continues with Kubernetes, a production-grade container orchestration tool. Let’s see which level of “production-readiness” it can support when running a stateful service like Galera Cluster.

Before we move further, let us highlight some of key differences between Kubernetes (1.6) and Docker Swarm (17.03) when running Galera Cluster on containers:

  • Kubernetes supports two health check probes - liveness and readiness. This is important when running a Galera Cluster on containers, because a live Galera container does not mean it is ready to serve and should be included in the load balancing set (think of a joiner/donor state). Docker Swarm only supports one health check probe similar to Kubernetes’ liveness, a container is either healthy and keeps running or unhealthy and gets rescheduled. Read here for details.
  • Kubernetes has a UI dashboard accessible via “kubectl proxy”.
  • Docker Swarm only supports round-robin load balancing (ingress), while Kubernetes uses least connection.
  • Docker Swarm supports routing mesh to publish a service to the external network, while Kubernetes supports something similar called NodePort, as well as external load balancers (GCE GLB/AWS ELB) and external DNS names (as for v1.7)

Installing Kubernetes using kubeadm

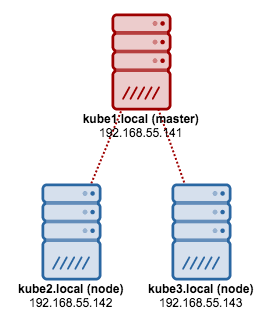
We are going to use kubeadm to install a 3-node Kubernetes cluster on CentOS 7. It consists of 1 master and 2 nodes (minions). Our physical architecture looks like this:

1. Install kubelet and Docker on all nodes:

$ ARCH=x86_64
cat <<EOF > /etc/yum.repos.d/kubernetes.repo
[kubernetes]
name=Kubernetes
baseurl=https://packages.cloud.google.com/yum/repos/kubernetes-el7-${ARCH}
enabled=1
gpgcheck=1
repo_gpgcheck=1
gpgkey=https://packages.cloud.google.com/yum/doc/yum-key.gpg
        https://packages.cloud.google.com/yum/doc/rpm-package-key.gpg
EOF
$ setenforce 0
$ yum install -y docker kubelet kubeadm kubectl kubernetes-cni
$ systemctl enable docker && systemctl start docker
$ systemctl enable kubelet && systemctl start kubelet

2. On the master, initialize the master, copy the configuration file, setup the Pod network using Weave and install Kubernetes Dashboard:

$ kubeadm init
$ cp /etc/kubernetes/admin.conf $HOME/
$ export KUBECONFIG=$HOME/admin.conf
$ kubectl apply -f https://git.io/weave-kube-1.6
$ kubectl create -f https://git.io/kube-dashboard

3. Then on the other remaining nodes:

$ kubeadm join --token 091d2a.e4862a6224454fd6 192.168.55.140:6443

4. Verify the nodes are ready:

$ kubectl get nodes
NAME          STATUS    AGE       VERSION
kube1.local   Ready     1h        v1.6.3
kube2.local   Ready     1h        v1.6.3
kube3.local   Ready     1h        v1.6.3

We now have a Kubernetes cluster for Galera Cluster deployment.

Galera Cluster on Kubernetes

In this example, we are going to deploy a MariaDB Galera Cluster 10.1 using Docker image pulled from our DockerHub repository. The YAML definition files used in this deployment can be found under example-kubernetes directory in the Github repository.

Kubernetes supports a number of deployment controllers. To deploy a Galera Cluster, one can use:

  • ReplicaSet
  • StatefulSet

Each of them has their own pro and cons. We are going to look into each one of them and see what’s the difference.

Prerequisites

The image that we built requires an etcd (standalone or cluster) for service discovery. To run an etcd cluster requires each etcd instance to be running with different commands so we are going to use Pods controller instead of Deployment and create a service called “etcd-client” as endpoint to etcd Pods. The etcd-cluster.yaml definition file tells it all.

To deploy a 3-pod etcd cluster, simply run:

$ kubectl create -f etcd-cluster.yaml

Verify if the etcd cluster is ready:

$ kubectl get po,svc
NAME                        READY     STATUS    RESTARTS   AGE
po/etcd0                    1/1       Running   0          1d
po/etcd1                    1/1       Running   0          1d
po/etcd2                    1/1       Running   0          1d

NAME              CLUSTER-IP       EXTERNAL-IP   PORT(S)             AGE
svc/etcd-client   10.104.244.200   <none>        2379/TCP            1d
svc/etcd0         10.100.24.171    <none>        2379/TCP,2380/TCP   1d
svc/etcd1         10.108.207.7     <none>        2379/TCP,2380/TCP   1d
svc/etcd2         10.101.9.115     <none>        2379/TCP,2380/TCP   1d

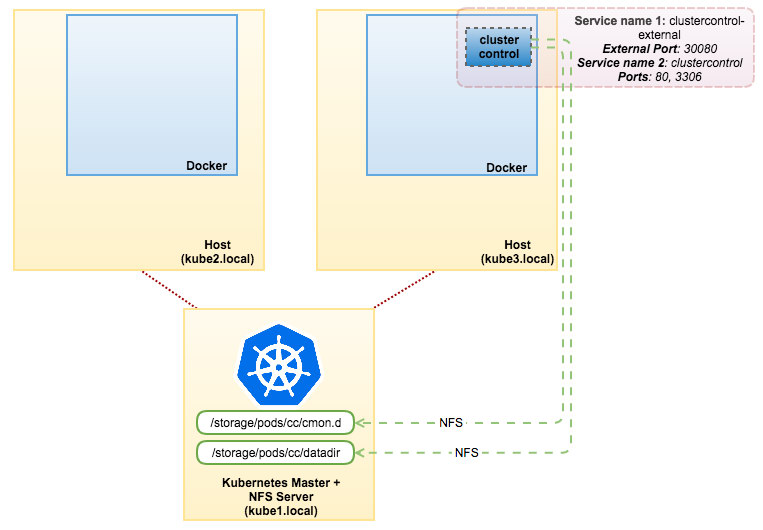
Our architecture is now looking something like this:

Using ReplicaSet

A ReplicaSet ensures that a specified number of pod “replicas” are running at any given time. However, a Deployment is a higher-level concept that manages ReplicaSets and provides declarative updates to pods along with a lot of other useful features. Therefore, it’s recommended to use Deployments instead of directly using ReplicaSets, unless you require custom update orchestration or don’t require updates at all. When you use Deployments, you don’t have to worry about managing the ReplicaSets that they create. Deployments own and manage their ReplicaSets.

In our case, we are going to use Deployment as the workload controller, as shown in this YAML definition. We can directly create the Galera Cluster ReplicaSet and Service by running the following command:

$ kubectl create -f mariadb-rs.yml

Verify if the cluster is ready by looking at the ReplicaSet (rs), pods (po) and services (svc):

$ kubectl get rs,po,svc
NAME                  DESIRED   CURRENT   READY     AGE
rs/galera-251551564   3         3         3         5h

NAME                        READY     STATUS    RESTARTS   AGE
po/etcd0                    1/1       Running   0          1d
po/etcd1                    1/1       Running   0          1d
po/etcd2                    1/1       Running   0          1d
po/galera-251551564-8c238   1/1       Running   0          5h
po/galera-251551564-swjjl   1/1       Running   1          5h
po/galera-251551564-z4sgx   1/1       Running   1          5h

NAME              CLUSTER-IP       EXTERNAL-IP   PORT(S)             AGE
svc/etcd-client   10.104.244.200   <none>        2379/TCP            1d
svc/etcd0         10.100.24.171    <none>        2379/TCP,2380/TCP   1d
svc/etcd1         10.108.207.7     <none>        2379/TCP,2380/TCP   1d
svc/etcd2         10.101.9.115     <none>        2379/TCP,2380/TCP   1d
svc/galera-rs     10.107.89.109    <nodes>       3306:30000/TCP      5h
svc/kubernetes    10.96.0.1        <none>        443/TCP             1d

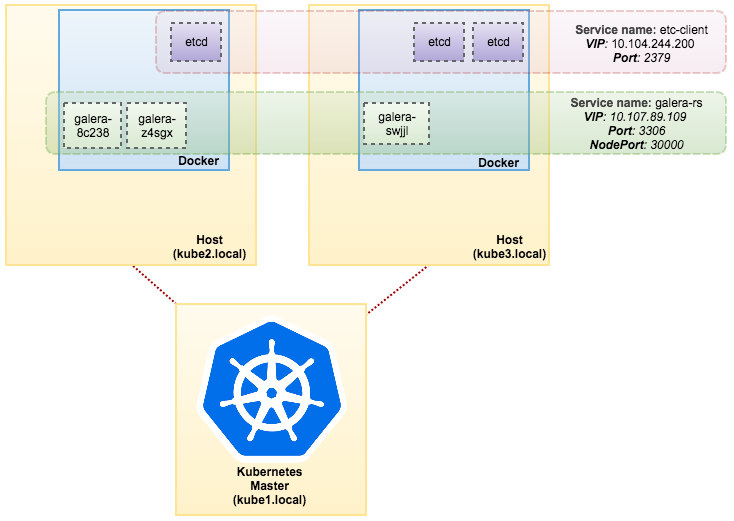
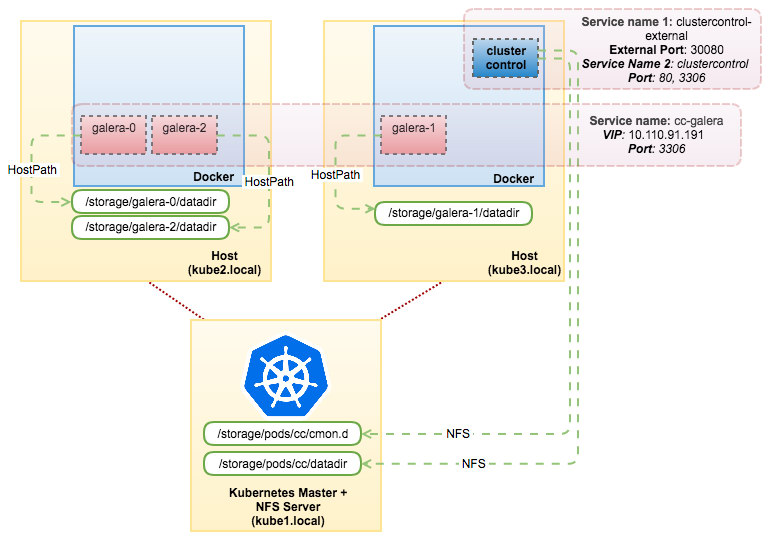
From the output above, we can illustrate our Pods and Service as below:

Running Galera Cluster on ReplicaSet is similar to treating it as a stateless application. It orchestrates pod creation, deletion and updates and can be targeted for Horizontal Pod Autoscales (HPA), i.e. a ReplicaSet can be auto-scaled if it meets certain thresholds or targets (CPU usage, packets-per-second, request-per-second etc).

If one of the Kubernetes nodes goes down, new Pods will be scheduled on an available node to meet the desired replicas. Volumes associated with the Pod will be deleted, if the Pod is deleted or rescheduled. The Pod hostname will be randomly generated, making it harder to track where the container belongs by simply looking at the hostname.

All this works pretty well in test and staging environments, where you can perform a full container lifecycle like deploy, scale, update and destroy without any dependencies. Scaling up and down is straightforward, by updating the YAML file and posting it to Kubernetes cluster or by using the scale command:

$ kubectl scale replicaset galera-rs --replicas=5

Using StatefulSet

Known as PetSet on pre 1.6 version, StatefulSet is the best way to deploy Galera Cluster in production, because:

  • Deleting and/or scaling down a StatefulSet will not delete the volumes associated with the StatefulSet. This is done to ensure data safety, which is generally more valuable than an automatic purge of all related StatefulSet resources.
  • For a StatefulSet with N replicas, when Pods are being deployed, they are created sequentially, in order from {0 .. N-1}.
  • When Pods are being deleted, they are terminated in reverse order, from {N-1 .. 0}.
  • Before a scaling operation is applied to a Pod, all of its predecessors must be Running and Ready.
  • Before a Pod is terminated, all of its successors must be completely shut down.

StatefulSet provides first-class support for stateful containers. It provides a deployment and scaling guarantee. When a three-node Galera Cluster is created, three Pods will be deployed in the order db-0, db-1, db-2. db-1 will not be deployed before db-0 is “Running and Ready”, and db-2 will not be deployed until db-1 is “Running and Ready”. If db-0 should fail, after db-1 is “Running and Ready”, but before db-2 is launched, db-2 will not be launched until db-0 is successfully relaunched and becomes “Running and Ready”.

We are going to use Kubernetes implementation of persistent storage called PersistentVolume and PersistentVolumeClaim. This to ensure data persistency if the pod got rescheduled to the other node. Even though Galera Cluster provides the exact copy of data on each replica, having the data persistent in every pod is good for troubleshooting and recovery purposes.

To create a persistent storage, first we have to create PersistentVolume for every pod. PVs are volume plugins like Volumes in Docker, but have a lifecycle independent of any individual pod that uses the PV. Since we are going to deploy a 3-node Galera Cluster, we need to create 3 PVs:

apiVersion: v1
kind: PersistentVolume
metadata:
  name: datadir-galera-0
  labels:
    app: galera-ss
    podindex: "0"
spec:
  accessModes:
  - ReadWriteOnce
  capacity:
    storage: 10Gi
  hostPath:
    path: /data/pods/galera-0/datadir
---
apiVersion: v1
kind: PersistentVolume
metadata:
  name: datadir-galera-1
  labels:
    app: galera-ss
    podindex: "1"
spec:
  accessModes:
  - ReadWriteOnce
  capacity:
    storage: 10Gi
  hostPath:
    path: /data/pods/galera-1/datadir
---
apiVersion: v1
kind: PersistentVolume
metadata:
  name: datadir-galera-2
  labels:
    app: galera-ss
    podindex: "2"
spec:
  accessModes:
  - ReadWriteOnce
  capacity:
    storage: 10Gi
  hostPath:
    path: /data/pods/galera-2/datadir

The above definition shows we are going to create 3 PV, mapped to the Kubernetes nodes’ physical path with 10GB of storage space. We defined ReadWriteOnce, which means the volume can be mounted as read-write by only a single node. Save the above lines into mariadb-pv.yml and post it to Kubernetes:

$ kubectl create -f mariadb-pv.yml
persistentvolume "datadir-galera-0" created
persistentvolume "datadir-galera-1" created
persistentvolume "datadir-galera-2" created

Next, create define the PersistentVolumeClaim:

kind: PersistentVolumeClaim
apiVersion: v1
metadata:
  name: mysql-datadir-galera-ss-0
spec:
  accessModes:
    - ReadWriteOnce
  resources:
    requests:
      storage: 10Gi
  selector:
    matchLabels:
      app: galera-ss
      podindex: "0"
---
kind: PersistentVolumeClaim
apiVersion: v1
metadata:
  name: mysql-datadir-galera-ss-1
spec:
  accessModes:
    - ReadWriteOnce
  resources:
    requests:
      storage: 10Gi
  selector:
    matchLabels:
      app: galera-ss
      podindex: "1"
---
kind: PersistentVolumeClaim
apiVersion: v1
metadata:
  name: mysql-datadir-galera-ss-2
spec:
  accessModes:
    - ReadWriteOnce
  resources:
    requests:
      storage: 10Gi
  selector:
    matchLabels:
      app: galera-ss
      podindex: "2"

The above definition shows that we would like to claim the PV resources and use the spec.selector.matchLabels to look for our PV (metadata.labels.app: galera-ss) based on the respective pod index (metadata.labels.podindex) assigned by Kubernetes. The metadata.name resource must use the format “{volumeMounts.name}-{pod}-{ordinal index}” defined under the spec.templates.containers so Kubernetes knows which mount point to map the claim into the pod.

Save the above lines into mariadb-pvc.yml and post it to Kubernetes:

$ kubectl create -f mariadb-pvc.yml
persistentvolumeclaim "mysql-datadir-galera-ss-0" created
persistentvolumeclaim "mysql-datadir-galera-ss-1" created
persistentvolumeclaim "mysql-datadir-galera-ss-2" created

Our persistent storage is now ready. We can then start the Galera Cluster deployment by creating a StatefulSet resource together with Headless service resource as shown in mariadb-ss.yml:

$ kubectl create -f mariadb-ss.yml
service "galera-ss" created
statefulset "galera-ss" created

Now, retrieve the summary of our StatefulSet deployment:

$ kubectl get statefulsets,po,pv,pvc -o wide
NAME                     DESIRED   CURRENT   AGE
statefulsets/galera-ss   3         3         1d        galera    severalnines/mariadb:10.1   app=galera-ss

NAME                        READY     STATUS    RESTARTS   AGE       IP          NODE
po/etcd0                    1/1       Running   0          7d        10.36.0.1   kube3.local
po/etcd1                    1/1       Running   0          7d        10.44.0.2   kube2.local
po/etcd2                    1/1       Running   0          7d        10.36.0.2   kube3.local
po/galera-ss-0              1/1       Running   0          1d        10.44.0.4   kube2.local
po/galera-ss-1              1/1       Running   1          1d        10.36.0.5   kube3.local
po/galera-ss-2              1/1       Running   0          1d        10.44.0.5   kube2.local

NAME                  CAPACITY   ACCESSMODES   RECLAIMPOLICY   STATUS    CLAIM                               STORAGECLASS   REASON    AGE
pv/datadir-galera-0   10Gi       RWO           Retain          Bound     default/mysql-datadir-galera-ss-0                            4d
pv/datadir-galera-1   10Gi       RWO           Retain          Bound     default/mysql-datadir-galera-ss-1                            4d
pv/datadir-galera-2   10Gi       RWO           Retain          Bound     default/mysql-datadir-galera-ss-2                            4d

NAME                            STATUS    VOLUME             CAPACITY   ACCESSMODES   STORAGECLASS   AGE
pvc/mysql-datadir-galera-ss-0   Bound     datadir-galera-0   10Gi       RWO                          4d
pvc/mysql-datadir-galera-ss-1   Bound     datadir-galera-1   10Gi       RWO                          4d
pvc/mysql-datadir-galera-ss-2   Bound     datadir-galera-2   10Gi       RWO                          4d

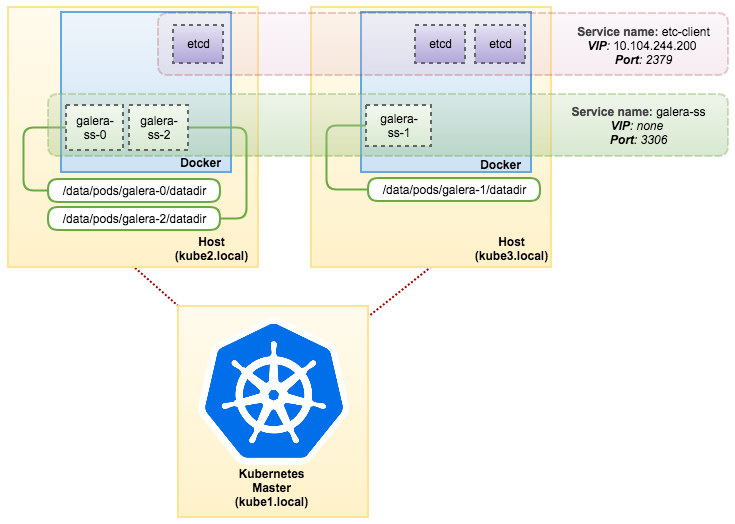
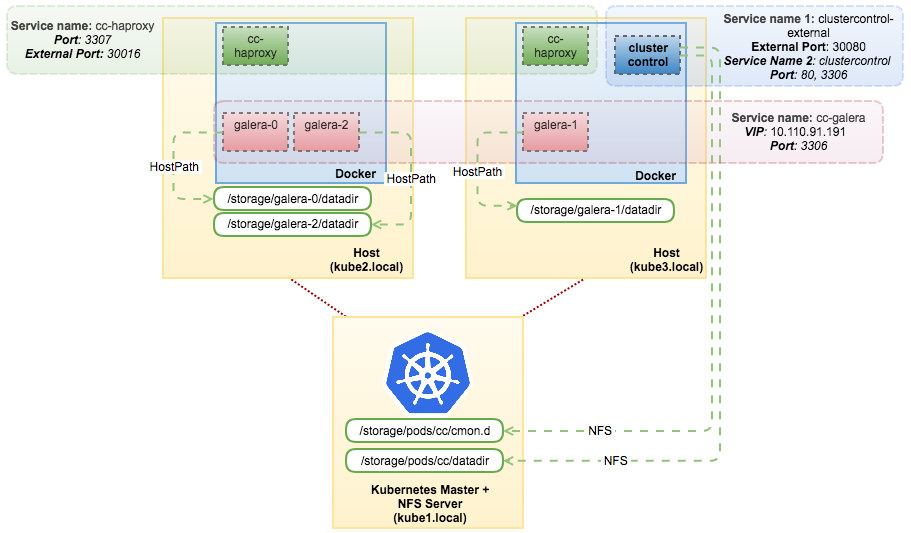
At this point, our Galera Cluster running on StatefulSet can be illustrated as in the following diagram:

Running on StatefuleSet guarantees consistent identifiers like hostname, IP address, network ID, cluster domain, Pod DNS and storage. This allows the Pod to easily distinguish itself from others in a group of Pods. The volume will be retained on the host and will not get deleted if the Pod is deleted or rescheduled onto another node. This allows for data recovery and reduces the risk of total data loss.

On the negative side, the deployment time will be N-1 times (N = replicas) longer because Kubernetes will obey the ordinal sequence when deploying, rescheduling or deleting the resources. It would be a bit of a hassle to prepare the PV and claims before thinking about scaling your cluster. Take note that updating an existing StatefulSet is currently a manual process, where you can only update spec.replicas at the moment.

Connecting to Galera Cluster Service and Pods

There are a couple of ways you can connect to the database cluster. You can connect directly to the port. In the “galera-rs” service example, we use NodePort, exposing the service on each Node’s IP at a static port (the NodePort). A ClusterIP service, to which the NodePort service will route, is automatically created. You’ll be able to contact the NodePort service, from outside the cluster, by requesting {NodeIP}:{NodePort}.

Example to connect to the Galera Cluster externally:

(external)$ mysql -udb_user -ppassword -h192.168.55.141 -P30000
(external)$ mysql -udb_user -ppassword -h192.168.55.142 -P30000
(external)$ mysql -udb_user -ppassword -h192.168.55.143 -P30000

Within the Kubernetes network space, Pods can connect via cluster IP or service name internally which is retrievable by using the following command:

$ kubectl get services -o wide
NAME          CLUSTER-IP       EXTERNAL-IP   PORT(S)             AGE       SELECTOR
etcd-client   10.104.244.200   <none>        2379/TCP            1d        app=etcd
etcd0         10.100.24.171    <none>        2379/TCP,2380/TCP   1d        etcd_node=etcd0
etcd1         10.108.207.7     <none>        2379/TCP,2380/TCP   1d        etcd_node=etcd1
etcd2         10.101.9.115     <none>        2379/TCP,2380/TCP   1d        etcd_node=etcd2
galera-rs     10.107.89.109    <nodes>       3306:30000/TCP      4h        app=galera-rs
galera-ss     None             <none>        3306/TCP            3m        app=galera-ss
kubernetes    10.96.0.1        <none>        443/TCP             1d        <none>

From the service list, we can see that the Galera Cluster ReplicaSet Cluster-IP is 10.107.89.109. Internally, another pod can access the database through this IP address or service name using the exposed port, 3306:

(etcd0 pod)$ mysql -udb_user -ppassword -hgalera-rs -P3306 -e 'select @@hostname'
+------------------------+
| @@hostname             |
+------------------------+
| galera-251551564-z4sgx |
+------------------------+

Internally, you can also connect to the external NodePort from inside the pod on port 30000:

(etcd0 pod)$ mysql -udb_user -ppassword -h192.168.55.143 -P30000 -e 'select @@hostname'
+------------------------+
| @@hostname             |
+------------------------+
| galera-251551564-z4sgx |
+------------------------+

Connection to the backend Pods will be load balanced accordingly using least connection.

Summary

At this point, running Galera Cluster on Kubernetes in production seems much more promising as compared to Docker Swarm. As discussed in the last blog post, the concerns raised are tackled differently with the way Kubernetes orchestrates containers in StatefulSet, (although it’s still a beta feature in v1.6). We do hope that the suggested approach is going to help run Galera Cluster on containers at scale in production.

Watch the tutorial: backup best practices for MySQL, MariaDB and Galera Cluster

$
0
0

Many thanks to everyone who registered and/or participated in Tuesday’s webinar on backup strategies and best practices for MySQL, MariaDB and Galera clusters led by Krzysztof Książek, Senior Support Engineer at Severalnines. If you missed the session, would like to watch it again or browse through the slides, they’re now online for viewing. Also check out the transcript of the Q&A session below.

Watch the webinar replay

Whether you’re a SysAdmin, DBA or DevOps professional operating MySQL, MariaDB or Galera clusters in production, you should make sure that your backups are scheduled, executed and regularly tested. Krzysztof shared some of his key best practice tips & tricks yesterday on how to do just that; including a live demo with ClusterControl. In short, this webinar replay shows you the pros and cons of different backup options and helps you pick the one that goes best with your environment.

Happy backuping!

Questions & Answers

Q. Can we control I/O while taking the backups with mysqldump and mysqldumper (I’ve used nice before, but it wasn’t helpful).

A. Theoretically it might be possible, although we haven’t really tested that. If you really want to apply some throttling then you may want to look into cgroups - it should help you to throttle I/O activity on a per-process basis.

Q. Can we take mydumper with ClusterControl and is ClusterControl is free software?

A. We don't currently support it, but you can always use it manually; ClusterControl doesn't prevent you from using this tool. There is a free community version of ClusterControl, yes, though its backup features are part of the commercial version. With the free community version you can deploy and monitor your database (clusters) as well as develop your own custom database advisors. You also have a one-month trial period that gives you access to all of ClusterControl’s features. You can find all the feature details here: https://severalnines.com/pricing

Q. Can xtrabackup work with data-at-rest encryption?

A. It can work with encrypted data in MySQL or Percona Server - it is because they encrypt only tablespaces, which xtrabackup just copies - it doesn’t have to access contents of tablespaces. MariaDB encrypts not only tablespaces but also, for example, InnoDB redo logs, which have to be accessed by xtrabackup - therefore xtrabackup cannot work with data-at-rest encryption as implemented in MariaDB. Because of this MariaDB Corporation forked xtrabackup into MariaDB Backup. This tool supports encryption done by MariaDB.

Q. Can you use mydumper for point-in-time recovery?

A. Yes, it is possible. mydumper can store GTID data so you can identify last applied transaction and use it as a starting position for processing binary logs.

Q. Is it a problem if we use binary logs with xtrabackup with start-datetime and end-datetime instead of start-position and end-position? We make a full backup on Fridays and every other day an incremental backup. When we need to recover we take the last full and all incremental backups and the binary logs from this day starting from 00:00 to NOW ... could there be a problem with apply-log?

A. In general, you should not use --start-datetime or --end-datetime when you want to reply binary log on the database. It’s not granular enough - it has a resolution of one second and there could be many transactions that happened during that second. You can use it to minimize timeframe to look for manually, but that’s all. If you want to replay binary logs, you should use --start-position and --end-position. Only this will precisely define from which event you will replay binlogs and on which event it’ll end up.

Q. Should I run the dump software on load balancer or one of the MySQL nodes?

A. Typically you’ll use it on MySQL nodes. Some of the tools can only do just that. For example, Xtrabackup - you have to run it locally, on the database host. You can stream output to another location, but it has to be started locally.

Q. Can we take partial backups with ClusterControl? And if yes, how can we restore a backup on a running instance?

A. Yes, you can take a partial backup using ClusterControl (you can backup separate schema using xtrabackup) but, as of now, you cannot restore a partial backup on a running instance. This is caused by the fact that the schema you’d recover will not be consistent with the rest of the cluster. To make it consistent, the cluster has to be bootstrapped from the node on which you restore a backup. So, technically, the node runs all the time but it’s a fairly heavy and invasive operation. This will change in the next version of ClusterControl in which you’d be able to restore backups on a separate host. From that host you could then dump contents of a restored schema using mysqldump (or mydumper) and restore it on a production cluster.

Q. Can you please share the mysqldumper command?

A. It’s rather hard to answer this question without doing copy and paste from the documentation, so we think it will be the best if we’d point you to the documentation: https://github.com/maxbube/mydumper/tree/master/docs

Watch the webinar replay


ClusterControl on Docker

$
0
0

(This blog was updated on June 20, 2017)

We’re excited to announce our first step towards dockerizing our products. Please welcome the official ClusterControl Docker image, available on Docker Hub. This will allow you to evaluate ClusterControl with a couple of commands:

$ docker pull severalnines/clustercontrol

The Docker image comes with ClusterControl installed and configured with all of its components, so you can immediately use it to manage and monitor your existing databases. Supported database servers/clusters:

  • Galera Cluster for MySQL
  • Percona XtraDB Cluster
  • MariaDB Galera Cluster
  • MySQL/MariaDB Replication
  • MySQL/MariaDB single instance
  • MongoDB Replica Set
  • PostgreSQL single instance

As more and more people will know, Docker is based on the concept of so called application containers and is much faster or lightweight than full stack virtual machines such as VMWare or VirtualBox. It's a very nice way to isolate applications and services to run in a completely isolated environment, which a user can launch and tear down the whole stack within seconds.

Having a Docker image for ClusterControl at the moment is convenient in terms of how quickly it is to get it up and running and it's 100% reproducible. Docker users can now start testing ClusterControl, since we have an image that everyone can pull down and then launch the tool.

ClusterControl Docker Image

The image is available on Docker Hub and the code is hosted in our Github repository. Please refer to the Docker Hub page or our Github repository for the latest instructions.

The image consists of ClusterControl and all of its components:

  • ClusterControl controller, CLI, cmonapi, UI and NodeJS packages installed via Severalnines repository.
  • Percona Server 5.6 installed via Percona repository.
  • Apache 2.4 (mod_ssl and mod_rewrite configured)
  • PHP 5.4 (gd, mysqli, ldap, cli, common, curl)
  • SSH key for root user.
  • Deployment script: deploy-container.sh

The core of automatic deployment is inside a shell script called “deploy-container.sh”. This script monitors a custom table inside CMON database called “cmon.containers”. The database container created by run command or some orchestration tool shall report and register itself into this table. The script will look for new entries and perform the necessary actions using s9s, the ClusterControl CLI. You can monitor the progress directly from the ClusterControl UI or using “docker logs” command.

New Deployment - ClusterControl and Galera Cluster on Docker

There are several ways to deploy a new database cluster stack on containers, especially with respect to the container orchestration platform used. The currently supported methods are:

  • Docker (standalone)
  • Docker Swarm
  • Kubernetes

A new database cluster stack would usually consist of a ClusterControl server with a three-node Galera Cluster. From there, you can scale up or down according to your desired setup. We have built another Docker image to serve as database base image called “centos-ssh”, which can be used with ClusterControl for automatic deployment. This image comes with a simple bootstrapping logic to download the public key from ClusterControl container (automatic passwordless SSH setup), register itself to ClusterControl and pass the environment variables for the chosen cluster setup.

Docker (Standalone)

To run on standalone Docker host, one would do the following:

  1. Run the ClusterControl container:

    $ docker run -d --name clustercontrol -p 5000:80 severalnines/clustercontrol
  2. Then, run the DB containers. Define the CC_HOST (the ClusterControl container's IP) environment variable or simply use container linking. Assuming the ClusterControl container name is ‘clustercontrol’:

    $ docker run -d --name galera1 -p 6661:3306 --link clustercontrol:clustercontrol -e CLUSTER_TYPE=galera -e CLUSTER_NAME=mygalera -e INITIAL_CLUSTER_SIZE=3 severalnines/centos-ssh
    $ docker run -d --name galera2 -p 6662:3306 --link clustercontrol:clustercontrol -e CLUSTER_TYPE=galera -e CLUSTER_NAME=mygalera -e INITIAL_CLUSTER_SIZE=3 severalnines/centos-ssh
    $ docker run -d --name galera3 -p 6663:3306 --link clustercontrol:clustercontrol -e CLUSTER_TYPE=galera -e CLUSTER_NAME=mygalera -e INITIAL_CLUSTER_SIZE=3 severalnines/centos-ssh

ClusterControl will automatically pick the new containers to deploy. If it finds the number of containers is equal or greater than INITIAL_CLUSTER_SIZE, the cluster deployment shall begin. You can verify that with:

$ docker logs -f clustercontrol

Or, open the ClusterControl UI at http://{Docker_host}:5000/clustercontrol and look under Activity -> Jobs.

To scale up, just run new containers and ClusterControl will add them into the cluster automatically:

$ docker run -d --name galera4 -p 6664:3306 --link clustercontrol:clustercontrol -e CLUSTER_TYPE=galera -e CLUSTER_NAME=mygalera -e INITIAL_CLUSTER_SIZE=3 severalnines/centos-ssh

Docker Swarm

Docker Swarm allows container deployment on multiple hosts. It manages a cluster of Docker Engines called a swarm.

Take note of some prerequisites for running ClusterControl and Galera Cluster on Docker Swarm:

  • Docker Engine version 1.12 and later.
  • Docker Swarm Mode is initialized.
  • ClusterControl must be connected to the same overlay network as the database containers.

In Docker Swarm mode, centos-ssh will default to look for 'cc_clustercontrol' as the CC_HOST. If you create the ClusterControl container with 'cc_clustercontrol' as the service name, you can skip defining CC_HOST variable.

We have explained the deployment steps in this blog post.

Kubernetes

Kubernetes is an open-source platform for automating deployment, scaling, and operations of application containers across clusters of hosts, and provides a container-centric infrastructure. In Kubernetes, centos-ssh will default to look for “clustercontrol” service as the CC_HOST. If you use other name, please specify this variable accordingly.

Example YAML definition of ClusterControl deployment on Kubernetes is available in our Github repository under Kubernetes directory. To deploy a ClusterControl pod using a ReplicaSet, the recommended way is:

$ kubectl create -f cc-pv-pvc.yml
$ kubectl create -f cc-rs.yml

Kubernetes will then create the necessary PersistentVolume (PV) and PersistentVolumeClaim (PVC) by connecting to the NFS server. The deployment definition (cc-rs.yml) will then run a pod and use the created PV resources to map the datadir and cmon configuration directory for persistency. This allows the ClusterControl pod to be relocated to other Kubernetes nodes if it is rescheduled by the scheduler.

Import Existing DB Containers into ClusterControl

If you already have a Galera Cluster running on Docker and you would like to have ClusterControl manage it, you can simply run the ClusterControl container in the same Docker network as the database containers. The only requirement is to ensure the target containers have SSH related packages installed (openssh-server, openssh-clients). Then allow passwordless SSH from ClusterControl to the database containers. Once done, use “Add Existing Server/Cluster” feature and the cluster should be imported into ClusterControl.

Example of importing the existing DB containers

We have a physical host, 192.168.50.130 installed with Docker, and assume that you already have a three-node Galera Cluster in containers, running under the standard Docker bridge network. We are going to import the cluster into ClusterControl, which is running in another container. The following is the high-level architecture diagram:

Adding into ClusterControl

  1. Install OpenSSH related packages on the database containers, allow the root login, start it up and set the root password:

    $ docker exec -ti [db-container] apt-get update
    $ docker exec -ti [db-container] apt-get install -y openssh-server openssh-client
    $ docker exec -it [db-container] sed -i 's|^PermitRootLogin.*|PermitRootLogin yes|g' /etc/ssh/sshd_config
    $ docker exec -ti [db-container] service ssh start
    $ docker exec -it [db-container] passwd
  2. Start the ClusterControl container as daemon and forward port 80 on the container to port 5000 on the host:

    $ docker run -d --name clustercontrol -p 5000:80 severalnines/clustercontrol
  3. Verify the ClusterControl container is up:

    $ docker ps | grep clustercontrol
    59134c17fe5a        severalnines/clustercontrol   "/entrypoint.sh"       2 minutes ago       Up 2 minutes        22/tcp, 3306/tcp, 9500/tcp, 9600/tcp, 9999/tcp, 0.0.0.0:5000->80/tcp   clustercontrol
  4. Open a browser, go to http://{docker_host}:5000/clustercontrol and create a default admin user and password. You should now see the ClusterControl landing page.

  5. The last step is setting up the passwordless SSH to all database containers. Attach to ClusterControl container interactive console:

    $ docker exec -it clustercontrol /bin/bash
  6. Copy the SSH key to all database containers:

    $ ssh-copy-id 172.17.0.2
    $ ssh-copy-id 172.17.0.3
    $ ssh-copy-id 172.17.0.4
  7. Start importing the cluster into ClusterControl. Open a web browser and go to Docker’s physical host IP address with the mapped port e.g, http://192.168.50.130:5000/clustercontrol and click “Add Existing Cluster/Server” and specify following information:

    Ensure you got the green tick when entering the hostname or IP address, indicating ClusterControl is able to communicate with the node. Then, click Import button and wait until ClusterControl finishes its job. The database cluster will be listed under the ClusterControl dashboard once imported.

Happy containerizing!

Docker: All the Severalnines Resources

$
0
0

While the idea of containers have been around since the early days of Unix, Docker made waves in 2013 when it hit the market with its innovative solution. What began as an open source project, Docker allows you to add your stacks and applications to containers where they share a common operating system kernel. This lets you have a lightweight virtualized system with almost zero overhead. Docker also lets you bring up or down containers in seconds, making for rapid deployment of your stack.

Severalnines, like many other companies, got excited early on about Docker and began experimenting and developing ways to deploy advanced open source database configurations using Docker containers. We also released, early on, a docker image of ClusterControl that lets you utilize the management and monitoring functionalities of ClusterControl with your existing database deployments.

Here are just some of the great resources we’ve developed for Docker over the last few years...

Severalnines on Docker Hub

In addition to the ClusterControl Docker Image, we have also provided a series of images to help you get started on Docker with other open source database technologies like Percona XtraDB Cluster and MariaDB.

Check Out the Docker Images

ClusterControl on Docker Documentation

For detailed instructions on how to install ClusterControl utilizing the Docker Image click on the link below.

Read More

Top Blogs

MySQL on Docker: Running Galera Cluster on Kubernetes

In our previous posts, we showed how one can run Galera Cluster on Docker Swarm, and discussed some of the limitations with regards to production environments. Kubernetes is widely used as orchestration tool, and we’ll see whether we can leverage it to achieve production-grade Galera Cluster on Docker.

Read More

MySQL on Docker: Swarm Mode Limitations for Galera Cluster in Production Setups

This blog post explains some of the Docker Swarm Mode limitations in handling Galera Cluster natively in production environments.

Read More

MySQL on Docker: Composing the Stack

Docker 1.13 introduces a long-awaited feature called Compose-file support. Compose-file defines everything about an application - services, databases, volumes, networks, and dependencies can all be defined in one place. In this blog, we’ll show you how to use Compose-file to simplify the Docker deployment of MySQL containers.

Read More

MySQL on Docker: Deploy a Homogeneous Galera Cluster with etcd

Our journey to make Galera Cluster run smoothly on Docker containers continues. Deploying Galera Cluster on Docker is tricky when using orchestration tools. With this blog, find out how to deploy a homogeneous Galera Cluster with etcd.

Read More

MySQL on Docker: Introduction to Docker Swarm Mode and Multi-Host Networking

This blog post covers the basics of managing MySQL containers on top of Docker swarm mode and overlay network.

Read More

MySQL on Docker: Single Host Networking for MySQL Containers

This blog covers the basics of how Docker handles single-host networking, and how MySQL containers can leverage that.

Read More

MySQL on Docker: Building the Container Image

In this post, we will show you two ways how to build a MySQL Docker image - changing a base image and committing, or using Dockerfile. We’ll show you how to extend the Docker team’s MySQL image, and add Percona XtraBackup to it.

Read More

MySQL Docker Containers: Understanding the basics

In this post, we will cover some basics around running MySQL in a Docker container. It walks you through how to properly fire up a MySQL container, change configuration parameters, how to connect to the container, and how the data is stored.

Read More

ClusterControl
Single Console for Your Entire Database Infrastructure
Find out what else is new in ClusterControl

ClusterControl on Docker

ClusterControl provides advanced management and monitoring functionality to get your MySQL replication and clustered instances up-and-running using proven methodologies that you can depend on to work. Used in conjunction with other orchestration tools for deployment to the containers, ClusterControl makes managing your open source databases easy with point-and-click interfaces and no need to have specialized knowledge about the technology.

ClusterControl delivers on an array of features to help manage and monitor your open source database environments:

  • Management & Monitoring: ClusterControl provides management features to repair and recover broken nodes, as well as test and automate MySQL upgrades.
  • Advanced Monitoring: ClusterControl provides a unified view of all MySQL nodes and clusters across all your data centers and lets you drill down into individual nodes for more detailed statistics.
  • Automatic Failure Detection and Handling: ClusterControl takes care of your replication cluster’s health. If a master failure is detected, ClusterControl automatically promotes one of the available slaves to ensure your cluster is always up.

Learn more about how ClusterControl can enhance performance here or pull the Docker Image here.

We hope that these resources prove useful!

Happy Clustering!

Announcing ClusterControl 1.4.2 - the DevOps Edition

$
0
0

Today we are pleased to announce the 1.4.2 release of ClusterControl - the all-inclusive database management system that lets you easily deploy, monitor, manage and scale highly available open source databases - and load balancers - in your infrastructure.

Release Highlights

For MySQL

Set up transparent failover of ProxySQL with Keepalived and Virtual IP

Keep query rules, users and other settings in sync across multiple instances

For PostgreSQL

New primary - standby deployment wizard for streaming replication

Automated failover and slave to master promotion

For MySQL, MongoDB & PostgreSQL

New Integrations with communications or incident response management systems such as Pagerduty, VictorOps, Telegram, Opsgenie and Slack

New Web SSH Console

And more! Read about the full details below.

Download ClusterControl

View release details and resources

Release description

This maintenance release of ClusterControl is all about consolidating the popular database management features our users have come to appreciate. And we have some great new features aimed at DevOps teams!

Our new integration with popular incident management and chat services lets you customise the alarms and get alerted in the ops tools you are already using - e.g., Pagerduty, VictorOps, Telegram, Opsgenie and Slack. You can also run any command available in the ClusterControl CLI from your CCBot-enabled chat.

ProxySQL can now be deployed in active standby HA mode with Keepalived and Virtual IP. It is also possible to export and synchronize configurations across multiple instances, which is an essential feature in a distributed environment.

And we’re introducing automatic failover and replication management of your PostgreSQL replication setups.

In more detail …

ChatOps with ClusterControl’s CCBot

In our previous ClusterControl release we included the new ClusterControl command line client (CLI). We have now made a new and improved CCBot available that has full integration with the CLI. This means you can use any command available in the CLI from your CCBot-enabled chat!

The command line client is intuitive and easy to use, and if you are a frequent command line user it will be quick to get accustomed to. However, not everyone has command line access to the hosts installed with ClusterControl, and if external connections to this node are prohibited, the CLI will not be able to send commands to the ClusterControl backend. Also some users may not be accustomed to work on the command line. Adding the CLI to our chatbot, CCBot, addresses both problems: this will empower those users to send commands to ClusterControl that they normally wouldn't have been able to.

New Integrations with popular notification systems

Alarms and Events can now easily be sent to incident management services like PagerDuty and VictorOps, or to chat services like Slack and Telegram. You can also use Webhooks if you want to integrate with other services to act on status changes in your clusters. The direct connections with these popular incident communication services allow you to customize how you are alerted from ClusterControl when something goes wrong with your database environments.

  • Send Alarms and Events to:
    • PagerDuty, VictorOps, and OpsGenie
    • Slack and Telegram
    • User registered Webhooks

Automated failover for PostgreSQL

Starting from ClusterControl 1.4.2, you can deploy an entire PostgreSQL replication setup in the same way as you would deploy MySQL and MongoDB: you can use the “Deploy Cluster” menu to deploy a primary and one or more PostgreSQL standby servers. Once the replication setup is deployed, ClusterControl will manage the setup and automatically recover failed servers.

Another feature is “Rebuild Replication Slave” job which is available for all slaves (or standby servers) in the replication setup. This is to be used for instance when you want to wipe out the data on the standby, and rebuild it again with a fresh copy of data from the primary. It can be useful if a standby server is not able to connect and replicate from the primary for some reason.

You can now easily check which queries are responsible for the load on your PostgreSQL setup. You’ll see here some basic performance data - how many queries of a given type have been executed? What was their maximum and average execution time? How the total execution time for that query looks like? Download ClusterControl to get started.

ProxySQL Improvements

In this release we have improvements for ProxySQL to help you deploy active/standby setups with Keepalived and Virtual IP. This improved integration with Keepalived and Virtual IP brings high availability and automatic failover to your load balancing.

And you can also easily synchronize a ProxySQL configuration that has query rules, users, and host groups with other instances to keep them identical.

  • Copy, Export and Import ProxySQL configurations to/from other instances to keep them in sync
  • Add Existing standalone ProxySQL instance
  • Add Existing Keepalived in active/passive setups
  • Deploy up to 3 ProxySQL instances with a Keepalived active/passive setup
  • Simplified Query Cache creation

New Web-based SSH Console

From the ClusterControl GUI, you now have SSH access to any of the database nodes right from your browser. This can be very useful if you need to quickly log into a database server and access the command line. Communication is based on HTTPS, so it is possible to access your servers from behind a firewall that restricts Internet access to only port 443. Access to WebSSH is configurable by the ClusterControl admin through the GUI.

  • Open a terminal window to any cluster nodes
    • Only supported with Apache 2.4+

There are a number of other features and improvements that we have not mentioned here. You can find all details in the ChangeLog.

We encourage you to test this latest release and provide us with your feedback. If you’d like a demo, feel free to request one.

Thank you for your ongoing support, and happy clustering!

PS.: For additional tips & tricks, follow our blog: https://severalnines.com/blog/.

What's New with ProxySQL in ClusterControl v1.4.2

$
0
0

ClusterControl v1.4.2 comes with a number of improvements around ProxySQL. The previous version, also known as “The ProxySQL Edition”, introduced a full integration of ProxySQL with MySQL Replication and Galera Cluster. With ClusterControl v1.4.2, we introduced some amazing features to help you running ProxySQL at scale in production. These features include running ProxySQL in high availability mode, keeping multiple instances in sync with each other, managing your existing ProxySQL instances and caching queries in one click.

High Availability with Keepalived

ProxySQL can be deployed as a distributed or centralized MySQL load balancer. Setting up a centralized ProxySQL usually requires two or more instances, these are coupled with a virtual IP address that provides a single endpoint for your database applications. This is a proven approach that we have been using with HAProxy. By having a primary ProxySQL instance and a backup instance, your load balancer would not be a single-point-of-failure. The following diagram shows an example architecture of centralized ProxySQL instances with Keepalived:

ClusterControl allows more than two ProxySQL instances to share the same virtual IP address. From the ClusterControl web interface, you can manage them from the Keepalived deployment wizard:

Note that Keepalived is automatically configured with a single-master-multiple-backups approach, where only one ProxySQL instance (assuming one instance per host) will hold the virtual IP address at a time. The rest will act as a hot-standby proxy, unless you explicitly connect to them via the instance IP address. Your application is simplified where you only need to connect to a single virtual IP address and the proxy will take care of load balancing connections on one of the available database nodes.

Add Existing ProxySQL

If you already installed ProxySQL manually, and want to manage it using ClusterControl, use the ‘Import ProxySQL’ feature to add it into ClusterControl. Before importing the instance, ensure ClusterControl is able to perform passwordless SSH to the target host. Once done, simply provide the ProxySQL host, the listening port (default to 6033) and ProxySQL administrator user credentials:

ClusterControl will then connect to the target host via SSH and perform some sanity checks before connecting to ProxySQL admin interface via local socket. You will then see it listed in the side menu of the Nodes tab, under ProxySQL section. That’s it, simple and straightforward. By ticking the ‘Import Configuration’, you can also choose to update the ProxySQL node with the configuration from an existing ProxySQL node.

Sync ProxySQL Instances

It is extremely common to deploy multiple instances of ProxySQL. One would deploy at least one primary and one standby for high availability purposes. Or the architecture might mandate multiple instances, for example one proxy instance per web server. Managing multiple ProxySQL instances can be a hassle though, as they need to be kept in sync - things like configurations, hostgroup definitions, query rules, backend/frontend users, global variables, and so on.

Consider the following architecture:

When you have a distributed ProxySQL deployment like the above, you need a way to synchronize configurations. Ideally, you would want to do this automatically and not rely on manually changing the configurations on each instance. ClusterControl v1.4.2 allows you to synchronize ProxySQL configurations between instances, or simply export and import the configuration from one instance to another.

When changing the configuration on a ProxySQL instance, you can use “Node Actions” -> “Synchronize Instances” feature to apply the configuration to another instance. The following configuration will be synced over:

  • Query rules
  • Hostgroups and servers
  • Users (backend and frontend)
  • Global variables
  • Scheduler
  • The content of ProxySQL configuration file (proxysql.cnf)

Take note that by clicking on “Synchronize”, the existing configuration on the target instance will be overwritten. There is a warning for that. A new job will be initiated by ClusterControl, and all changes will be flushed to disk on the target node to make it persistent across restarts.

Simplified Query Cache

ProxySQL allows you to cache specific read queries, as well as specify how long they should be cached. Resultsets are cached in native MySQL packets format. This offloads the database servers and applications have faster access to cached data. This also reduces the need for a separate caching layer (e.g. Redis or Memcached).

You can now cache any query digested by ProxySQL with a single click. Simply rollover the query that you would like to cache and click “Cache Query”:

ClusterControl will provide a shortcut to add a new query rule to cache the selected query:

Define the Rule ID (query is processed based on this ordering), destination hostgroup and TTL value in milliseconds. Click “Add Rule” to start cache the query. You can then verify from ProxySQL’s Rules page if the current incoming query matches the rule by looking at the “Hits” column:

That’s it for now. You are welcome to install ClusterControl and try out the ProxySQL features. Happy proxying!

Introducing the ClusterControl Alerting Integrations

$
0
0

The time to respond to outages is one of the most important metrics to measure, when you have a 24/7 business to run. Incident response applications, like VictorOps and PagerDuty, will report back their effectiveness using this metric. Next to responding to an outage, it is equally important to receive correct information in a timely way. If the incident is serious enough, the outage could potentially cost you a lot of money in lost business or simply because there was no availability.

Databases are becoming the key element of many applications and services, so any outage of a database could create a cascading effect. Such an outage should be resolved as quickly as possible, so early detection and alerting is key. In many cases the failover software used will be the most suitable to detect and alert on any outage, but in many cases the software is fairly limited in its functionality to alert. This generally means secondary monitoring systems are required to detect outages and alert on them. ClusterControl is not only able to detect outages on your database clusters, but can also pre-emptively detect (performance) issues that may arise. Apart from this it is also capable of sending out alerts.

Whether your team is using devops, chatops or traditional incident response management, you will need to get the communication flow going as quickly as possible. Many of us use external incident response applications like VictorOps or PagerDuty to get alerted and have (multiple) internal communication channels to collaboratively resolve these issues with your colleagues.  So how would you make sure your database alerts get propagated to each and every channel used? In this blog post, we will explain how to do this with the ClusterControl Integrations!

ClusterControl Integrations

Previously ClusterControl made it possible to propagate (critical) alerts and warnings to other systems, using our Notification Services framework. This required the user to install a nodejs service, which would send these messages to the user’s application. In some cases the nodejs service required some additional modifications.

In ClusterControl 1.4.2 we have overhauled this functionality and replaced it with ClusterControl Integrations. ClusterControl Integrations do not require any modifying of external files. In effect the integration with applications and services has now become so easy, that on average you can add a new integration in less than one minute!

To prevent you from receiving too many notifications, ClusterControl integrations also allow you to send out only specific critical alerts or warnings. This can be done in the same categorization as you are used to with our Email Notifications.

Current available integrations in ClusterControl are Pagerduty, VictorOps, Telegram, Opsgenie and Slack. If your application is not in the list, we also have a generic webhook that allows you to integrate ClusterControl into most existing applications.

For each of the integrations, we have a contextual help system that will guide you through the process.

As an example of how easy it is to do an integration, we will add two new integrations: Slack and VictorOps.

Adding the Slack integration

The Slack integration starts with going to the Apps & Integrations of your Slack group:

In this screen you can go to the Custom Integrations screen to add a new Incoming Webhook:

If you don’t see this app installed, you can search for it in the top Search App Directory field. Once selected you can install it for your Slack group and add the new Incoming Webhook from here.

You can have the webhook post to a user, a specific channel or just the #general channel in your Slack group. Once added, the Custom Integrations will show you the url you can post to:

Copy this URL and then paste it in the second ClusterControl Integrations step of Slack, and add a good descriptive name to the integration:

If you are uncertain if everything works, you can press the test button here to see if the webhook works.

In the third step you can select for which clusters and what type of messages you wish to send via the integration.

After we have added the integration, we can also verify in the edit screen if the integration is working. And as you can see, we have received a test message from ClusterControl in the designated channel.

Adding the VictorOps integration

Adding the VictorOps integration is very similar to the Slack integration: simply go to your VictorOps account and retrieve the REST integration url.

You can find the VictorOps REST integration by logging into VictorOps, go to Settings > Integrations. There will be a very long list of various integrations, but you must pick the REST integrations from here.

Then inside the VictorOps REST integration screen, you simply enable the integration. This will generate the URL that we need to use in ClusterControl.

After adding the URL to ClusterControl and naming the new integration, we can define which clusters and types of notifications we wish to send via the integration.

And just like with our Slack integration, we can verify if the integration works via the test button in the Edit screen. If everything goes well, you should see the test message from CusterControl appear on your timeline.

Conclusion

We have shown you how easy it is to integrate ClusterControl to your company communication channels, incident response- and workflow applications. We have added the most common applications, and provide a generic webhook to integrate others. Please let us know in the comments how this works for you, and in case you’d like to see integrations for other applications.

Automatic failover of Postgres Replication - New in ClusterControl 1.4.2

$
0
0

Streaming replication setups with Postgres are inevitably related to failovers. The sole writer in the setup would be the primary, it generates XLOG records and continuously ships them to one or more standby servers. If the primary fails, one of the standby servers will have to take its role through the process of failover. This process can be tricky and potentially, it may cause data loss. It may happen, for example, if a standby is not up to date while it is promoted. The master may also die before it is able to transfer all binlog events to at least one of its standby’s.

PostgreSQL has been supported by ClusterControl for a while, it provided an easy way to deploy a streaming replication setup, with a primary server and one or more standby servers. ClusterControl 1.4.2 brings major improvements related to how ClustertControl handles failures in a PostreSQL replication setup. In this blog, we’ll have a look at these features.

Deploying entire replication topologies

Starting from ClusterControl 1.4.2, you can deploy an entire PostgreSQL replication setup in the same way as you would deploy MySQL and MongoDB: you can use “Deploy Cluster” menu to deploy a primary and one or more PostgreSQL standby servers. Let’s see what it looks like.

First, you need to define access details, as usual when deploying new clusters using ClusterControl. It requires root or sudo password access to all nodes on which PostgreSQL will be deployed.

Next, we need to define user and password for the PostgreSQL user.

Finally, you want to define topology - which host should be the primary and which hosts should be configured as standby. While you define hosts in the topology, ClusterControl will check if the ssh access works as expected - this lets you catch any connectivity issues early on. That’s pretty much it, it is then a matter of starting the deployment. A job is created in ClusterControl, and you will be able to follow the progress.

Failover handling

Once the replication setup is deployed, ClusterControl is able to monitor the setup and automatically recover failed servers. It can also orchestrate changes in topology.

First, ClusterControl now supports full failover handling - when a master failure is detected, a list of master candidates is created and one of them is chosen to be the new master. It is possible to have a whitelist of servers to promote to primary, as well as a blacklist of servers that cannot be promoted to primary. The remaining slaves are now slaved off the new primary, and the old primary is not restarted.

ClusterControl intentionally keeps the old primary offline because it may happen that some of the data has not been transferred to the standby servers. In such case, the primary is the only host containing this data and you may want to recover the missing data manually. For those who want to have the failed primary automatically rebuilt, there is an option in the cmon configuration file: replication_auto_rebuild_slave. By default, it’s disabled but when the user enables it, the failed primary will be rebuilt as a slave of the new primary. Of course, if there is any missing data which exists only on the failed primary, that data will be lost.

Rebuilding standby servers

Another feature is “Rebuild Replication Slave” job which is available for all slaves (or standby servers) in the replication setup. This is to be used for instance when you want to wipe out the data on the standby, and rebuild it again with a fresh copy of data from the primary. It can be useful if a standby server is not able to connect and replicate from the primary for some reason.

Monitoring Queries

Last of the new PostgreSQL features we’d like to discuss is Query Monitor.

You can now easily check which queries are responsible for the load on your PostgreSQL setup. You’ll see here some basic performance data - how many queries of a given type have been executed? What was their maximum and average execution time? How the total execution time for that query looks like? This should be enough to give you insight into what queries cause the highest load on the system, and on which of them to focus.

So, all in all, ClusterControl 1.4.2 has some good stuff for PostgreSQL users. Do give it a try, and let us know how we’re doing.

Video: ClusterControl ChatOps Integrations - Product Demonstration

$
0
0

The video below details the new ChatOps Integrations available in the latest version of ClusterControl.  Included in the video are…

  • Overview of ClusterControl Integrations
  • Installing new integrations
  • Configuring which clusters to monitor
  • Selecting what items to communicate alerts
  • Adding multiple chatops integrations
  • Using webhooks to set up custom alerts
ClusterControl
Single Console for Your Entire Database Infrastructure
Find out what else is new in ClusterControl

ClusterControl ChatOps Integrations

Included in the latest release of ClusterControl are direct connections for many popular incident communication services that allow to customize how you are alerted from ClusterControl when something goes wrong with your database environments.

ClusterControl integrates with...

  • Slack
  • Flowdock
  • Hipchat
  • Campfire
  • PagerDuty
  • IRC
  • Telegram
  • OpsGenie
  • VictorOps

Learn more about the new ClusterControl chatops integrations here.


Webinar - DevOps Tutorial: How to Automate Your Database Infrastructure

$
0
0

Join us for our live “DevOps Tutorial: how to automate your database infrastructure” on Tuesday, July 18th! Our guest speaker this time will be Riaan Nolan of mukuru.com, the First Puppet Labs Certified Professional in South Africa; Riaan saves the companies he works for 50% of their monthly IT bills on average.

In this new webinar we will talk you through the facets of DevOps integrations and the mission-critical advantages that database automation can bring to your database infrastructure.

As the operations person in your organisation, when your systems go down, your first priority is to restore services immediately. So what if your application stack could automatically recover (and let you sleep at night)? Why still stick to complex manual processes, which take up time and resources, and slow down future growth?

Infrastructure automation isn’t easy, but it’s not rocket science either, says Riaan Nolan. Riaan has been in operations for the past decade, and has built over a dozen eCommerce properties. Automation is a worthwhile investment, but deciding on which tools to invest in can be a confusing and overwhelming process.

Join us for this webinar to understand the key pain points, which indicate that it’s time to invest in database automation.

Sign up below!

Date, Time & Registration

Europe/MEA/APAC

Tuesday, July 18th at 09:00 BST / 10:00 CEST (Germany, France, Sweden)

Register Now

North America/LatAm

Tuesday, July 18th at 09:00 PST (US) / 12:00 EST (US)

Register Now

Agenda

  • DevOps and databases - what are the challenges
  • Managing databases in a DevOps environment
    • Requirements from microservice environments
    • Automated deployments
    • Performance monitoring
    • Backups
    • Schema changes
    • Version upgrades
    • Automated failover
    • Integration with ChatOps and other tools
  • Data distribution
    • Database hosting in cloud environments
    • Managing data flows
  • Cloud Automation on AWS

Speakers

Riaan Nolan was the First Puppet Labs Certified Professional in South Africa. Riaan uses Amazon EC2, VPC and Autoscale with Cloudformation to spin up complete stacks with Autoscaling Fleets. He saves companies substantial amounts on their monthly IT bills, typically around 50% - yes, at one company that meant $500k+ per year. And he’s participated in a number of community tech related forums. He uses next generation technologies such as AWS, Cloudformation, Autoscale, Puppet, GlusterFS, NGINX, Magento and PHP to power huge eCommerce stores. His specialties are Puppet Automation, Cloud Deployments, eCommerce, eMarketing, Specialized Linux Services, Windows, Process making, Budgets, Asset Tracking, Procurement.

  • Devops Lead, Mukuru
  • Expert Live Systems Administrator, foodpanda | Hellofood
  • Senior Systems Administrator / Infrastructure Lead, Rocket Internet GmbH
  • Senior Technology Manager, Africa Internet Accelerator

Art van Scheppingen is a Senior Support Engineer at Severalnines. He’s a pragmatic database expert with over 16 years experience in web development. He previously worked at Spil Games as Head of Database Engineering, where he kept a broad vision upon the whole database environment: from MySQL to MongoDB, Vertica to Hadoop and from Sphinx Search to SOLR. He regularly presents his work and projects at various conferences (Percona Live, MongoDB Open House, FOSDEM) and related meetups.

We look forward to “seeing” you there!

MySQL on Docker: Running Galera Cluster in Production with ClusterControl on Kubernetes

$
0
0

In our “MySQL on Docker” blog series, we continue our quest to make Galera Cluster run smoothly in different container environments. One of the most important things when running a database service, whether in containers or bare-metal, is to eliminate the risk of data loss. We will see how we can leverage a promising feature in Kubernetes called StatefulSet, which orchestrates container deployment in a more predictable and controllable fashion.

In our previous blog post, we showed how one can deploy a Galera Cluster within Docker with the help of Kubernetes as orchestration tool. However, it is only about deployment. Running a database in production requires more than just deployment - we need to think about monitoring, backups, upgrades, recovery from failures, topology changes and so on. This is where ClusterControl comes into the picture, as it completes the stack and makes it production ready. In simple words, Kubernetes takes care of database deployment and scaling while ClusterControl fills in the missing components including configuration, monitoring and ongoing management.

ClusterControl on Docker

This blog post describes how ClusterControl runs in a Docker environment. The Docker image has been updated, and now comes with the standard ClusterControl packages in the latest stable branch with additional support for container orchestration platforms like Docker Swarm and Kubernetes, we’ll describe this further below. You can also use the image to deploy a database cluster on a standalone Docker host.

Details at the Github repository or Docker Hub page.

ClusterControl on Kubernetes

The updated Docker image now supports automatic deployment of database containers scheduled by Kubernetes. The steps are similar to the Docker Swarm implementation, where the user decides the specs of the database cluster and ClusterControl automates the actual deployment.

ClusterControl can be deployed as ReplicaSet or StatefulSet. Since it’s a single instance, either way works. The only significant difference is the container identification would be easier with StatefulSet, since it provides consistent identifiers like the container hostname, IP address, DNS and storage. ClusterControl also provides service discovery for the new cluster deployment.

To deploy ClusterControl on Kubernetes, the following setup is recommended:

  • Use centralized persistent volumes supported by Kubernetes plugins (e.g. NFS, iSCSI) for the following paths:
    • /etc/cmon.d - ClusterControl configuration directory
    • /var/lib/mysql - ClusterControl cmon and dcps databases
  • Create 2 services for this pod:
    • One for internal communication between pods (expose port 80 and 3306)
    • One for external communication to outside world (expose port 80, 443 using NodePort or LoadBalancer)

In this example, we are going to use simple NFS. Make sure you have an NFS server ready. For the sake of simplicity, we are going to demonstrate this deployment on a 3-host Kubernetes cluster (1 master + 2 Kubernetes nodes). For production use, please use at least 3 Kubernetes nodes to minimize the risk of losing quorum.

With that in place, we can deploy the ClusterControl as something like this:

On the NFS server (kube1.local), install NFS server and client packages and export the following paths:

  • /storage/pods/cc/cmon.d - to be mapped with /etc/cmon.d
  • /storage/pods/cc/datadir - to be mapped with /var/lib/mysql

Ensure to restart NFS service to apply the changes. Then create PVs and PVCs, as shown in cc-pv-pvc.yml:

$ kubectl create -f cc-pv-pvc.yml

We are now ready to start a replica of the ClusterControl pod. Send cc-rs.yml to Kubernetes master:

$ kubectl create -f cc-rs.yml

ClusterControl is now accessible on port 30080 on any of the Kubernetes nodes, for example, http://kube1.local:30080/clustercontrol. With this approach (ReplicaSet + PV + PVC), the ClusterControl pod would survive if the physical host goes down. Kubernetes will automatically schedule the pod to the other available hosts and ClusterControl will be bootstrapped from the last existing dataset which is available through NFS.

Galera Cluster on Kubernetes

If you would like to use the ClusterControl automatic deployment feature, simply send the following YAML files to the Kubernetes master:

$ kubectl create -f cc-galera-pv-pvc.yml
$ kubectl create -f cc-galera-ss.yml

Details on the definition files can be found here - cc-galera-pv-pvc.yml and cc-galera-ss.yml.

The above commands tell Kubernetes to create 3 PVs, 3 PVCs and 3 pods running as StatefulSet using a generic base image called “centos-ssh”. In this example, the database cluster that we are going to deploy is MariaDB 10.1. Once the containers are started, they will register themselves to ClusterControl CMON database. ClusterControl will then pick up the containers’ hostname and start the deployment based on the variables that have been passed.

You can check the progress directly from the ClusterControl UI. Once the deployment has finished, our architecture will look something like this:

HAProxy as Load Balancer

Kubernetes comes with an internal load balancing capability via the Service component when distributing traffic to the backend pods. This is good enough if the balancing (least connections) fits your workload. In some cases, where your application needs to send queries to a single master due to deadlock or strict read-after-write semantics, you have to create another Kubernetes service with a proper selector to redirect the incoming connection to one and only one pod. If this single pod goes down, there is a chance of service interruption when Kubernetes schedules it again to another available node. What we are trying to highlight here is that if you’d want better control on what’s being sent to the backend Galera Cluster, something like HAProxy (or even ProxySQL) is pretty good at that.

You can deploy HAProxy as a two-pod ReplicaSet and use ClusterControl to deploy, configure and manage it. Simply post this YAML definition to Kubernetes:

$ kubectl create -f cc-haproxy-rs.yml

The above definition instructs Kubernetes to create a service called cc-haproxy and run two replicas of “severalnines/centos-ssh” image without automatic deployment (AUTO_DEPLOYMENT=0). These pods will then connect to the ClusterControl pod and perform automatic passwordless SSH setup. What you need to do now is to log into ClusterControl UI and start the deployment of HAProxy.

Firstly, retrieve the IP address of HAProxy pods:

$ kubectl describe pods -l app=cc-haproxy | grep IP
IP:        10.44.0.6
IP:        10.36.0.5

Then use the address as the HAProxy Address under ClusterControl -> choose the DB cluster -> Manage -> Load Balancer -> HAProxy -> Deploy HAProxy, as shown below:

**Repeat the above step for the second HAProxy instance.

Once done, our Galera Cluster can be accessible through the “cc-haproxy” service on port 3307 internally (within Kubernetes network space) or port 30016 externally (outside world). The connection will be load balanced between these HAProxy instances. At this point, our architecture can be illustrated as the following:

With this setup, you have maximum control of your load-balanced Galera Cluster running on Docker. Kubernetes brings something good to the table by supporting stateful service orchestration.

Do give it a try. We would love to hear how you get along.

Video: ClusterControl & PostgreSQL - Product Demonstration

$
0
0

The video below details the features and functions in ClusterControl for PostgreSQL. Included in this demonstration video are...

  • Overview of PostgreSQL features
  • Deploying a PostgreSQL cluster
  • Configuring master and slave nodes
  • Monitoring your cluster
  • Adding additional nodes to an existing cluster
  • Rebuilding slaves
ClusterControl
Single Console for Your Entire Database Infrastructure
Find out what else is new in ClusterControl

ClusterControl for PostgreSQL

As most of you will know, PostgreSQL is a powerful, open-source relational database system powered by a strong community that is not controlled by any corporation or other private entity. And we’re excited about the new features we recently announced for it with the latest version of ClusterControl (1.4.2) such as the ability to deploy entire replication topologies with our new deployment wizard, advanced failover handling, and new monitoring queries.

ClusterControl provides the basic functionality you need to get PostgreSQL up-and-running using our deployment wizard, monitoring and basic management abilities like automatic failover, backups, and restores.

ClusterControl for PostgreSQL includes...

  • Point and Click Replication Deployments - ClusterControl allows you to easily deploy and configure master/slave replication PostgreSQL instances.
  • Advanced Performance Monitoring - ClusterControl monitors queries and detects anomalies with built-in alerts.
  • Automated Failover Handling - ClusterControl detects master failures and automatically promotes a new master
  • Database Automation - ClusterControl lets you manage configurations, schedule, and restore backups.

Learn more about ClusterControl and PostgreSQL here.

Become a PostgreSQL DBA - Logical & Physical PostgreSQL Backups

$
0
0

Taking backups and having a recovery plan is one of the most important tasks of a DBA - they are crucial to the availability and integrity of the data. You can build replication clusters spanning across multiple datacenters and this helps you handle failure of a node (one or more), but only a backup can help you after an incidental DELETE or DROP. In this blog post we will discuss some backup options available for PostgreSQL.

Backup types

There are two main backup types - logical and physical backups. This is quite important to understand before you design your backup strategy. The backup type also determines which tools you will be using.

Logical backups

Logical backups typically contain data stored in plain text, in human-readable format or it can be easily converted to such format. This is quite useful because, if needed, you can extract even a single row and restore it. On the other hand, restoring an entire logical backup can be quite slow - the database has to process all of the queries required to load the data and this will always be slower than to just copy the database files.

Physical backups

Physical backups grab the data as it is - in the end, the data is just a bunch of files stored on some disk. You can copy the data files and have a copy of your database at a given point in time. In real life though, it is not as easy as running a cp command. When taking a physical backup you need to keep in mind that there might be database changes in the meantime. To ensure your backup can be safely used, any physical backup has to be consistent.

Physical backups are great for recovering whole data sets - the speed is limited by hardware: disk and sometimes network (if you copy the data over the network).

Backups in PostgreSQL

PostgreSQL, like many other databases, supports both physical and logical backups. Let’s take a look how you can setup them up.

Logical backup in PostgreSQL

PostgreSQL comes with a tool called pg_dump - it’s a utility designed to perform logical backups on the PostgreSQL database. It supports several output formats: by default it stores data in plain text files but it can also produce tar file or a custom binary format, compressed, which can be restored using pg_restore (you can easily extract SQL contents from this format). Let’s see how we can use pg_dump to create a backup of our PostgreSQL server.

First, backup in default mode, plain text SQL:

root@vagrant-ubuntu-trusty-64:~/c# pg_dump -d pgbench -U psql -h 10.0.0.101 > pgbench.sql
Password:

Then, in the output file, you can see data stored like this:

COPY pgbench_accounts (aid, bid, abalance, filler) FROM stdin;
1       1       0
2       1       0
3       1       0
4       1       0
5       1       0
6       1       0
7       1       0
8       1       0
9       1       0
10      1       0
11      1       0
12      1       0
13      1       0
14      1       0

If you feel like using some other output format, you need to specify it explicitly:

root@vagrant-ubuntu-trusty-64:~# pg_dump -d pgbench -U psql -h 10.0.0.101 --format c  -f /root/c/pgdump.c
Password:

Restoring data is fairly simple. If you do have data in default, SQL format, just use psql to load it into the database. If you used one of the other formats, you can use pg_restore to load it. If you still have the old data and you want to recover the full database, you may want to drop the existing database and then recreate it. You can also use the following flats:

  -c, --clean                  clean (drop) database objects before recreating
  --if-exists                  use IF EXISTS when dropping objects

While dumping the data, this makes sure that all existing objects will be overwritten.

postgres=# drop database pgbench;
DROP DATABASE
postgres=# create database pgbench;
CREATE DATABASE
root@vagrant-ubuntu-trusty-64:~# pg_restore --format c /root/c/pgdump.c -d pgbench -U psql -W -h 10.0.0.101
Password:

Please keep in mind that pg_dump generates consistent backups - it uses a single transaction to dump the data so it is relying on MVCC to keep its session separated and not affected by transactions opened afterwards.

Physical backup in PostgreSQL

Physical backups are all-or-nothing - you take a full copy of the database cluster and you can restore all of it. The challenge is to make the backup consistent. Of course, the easiest way to do that would be to stop PostgreSQL completely and then make a copy of the data using one of the typical Unix tools like cp, scp or rsync. Unfortunately, it is not often that you have the possibility to shutdown your database. Therefore you need to take some precautions to ensure your backup is consistent. To take manual, consistent, physical backups, following steps are required:

  1. You need to create a checkpoint using pg_start_backup(‘some label’)
  2. Copy contents of the data directory
  3. Stop backup using pg_stop_backup()

This can be simplified by running pg_basebackup:

root@vagrant-ubuntu-trusty-64:~# pg_basebackup -U psql -h 10.0.0.101 -x -D /pgbase/

If you want to have Point-In-Time-Recovery, you need to configure WAL archiving by enabling it:

wal_level = archive
archive_mode = on

You also want to define archive_command in a way it will copy WAL segments to a separate location.

Restoring base backup is easy - copy the data into clear PostgreSQL data directory and you are all set - once you start the PostgreSQL process, you will restore your data up to the time of the backup. To recover your PostgreSQL to point-in-time, using archived WAL logs, you still need to recover the base backup but then you need to create a recovery.conf file with, at least, a restore_command defined - you want to tell PostgreSQL how it can copy back archived WAL segments to be replayed at the start of the PostgreSQL process.

ClusterControl
Single Console for Your Entire Database Infrastructure
Find out what else is new in ClusterControl

PostgreSQL Backups in ClusterControl

As of ClusterControl 1.4.2, only pg_dump backups are supported. As with other supported database types, you can create ad-hoc backups or create a backup schedule. Below you can see the dialog related to creating ad-hoc backups.

As you can see in the screenshot above, the backup can be streamed to the controller node using netcat. You can also pick a node to backup from or let ClusterControl to pick one automatically. There’s a also an option to enable compression.

If you’d like to create a backup schedule, it’s very similar to the screen above.

You can define when the backup should be taken and what to do if a backup node is not available - should ClusterControl pick another available node to take a backup from, and which node should it be?

Of course, if you have a backup, you need to be able to restore it.

As you can see in the screenshot above, you can pick the node on which the backup should be restored.

We hope you enjoyed this short blog on different backup scenarios for PostgreSQL. If you’d like to see how easy is to schedule backups of your PostgreSQL servers using ClusterControl, feel free to check it out.

An Expert's Introduction to PostgreSQL, Database Management and ClusterControl

$
0
0

With the latest release of ClusterControl we’ve introduced a range of key new features to automate and manage PostgreSQL (alongside MySQL and MongoDB).

PostgreSQL is not only the world’s most advanced open source database (in its own words), but it is also currently the second most popular one after MySQL and before MongoDB (according to DB-Engines).

We’ve been working closely with a partner from the Netherlands, OptimaData, in the past few months to bring users the good news about open source database automation and management.

They happen to have a particular affection for PostgreSQL, so we’ve asked them to contribute to today’s blog post, which is all about singing the praises of PostgreSQL and recommendations on which systems or tools to use to automate and manage it.

We’ll start with the basics though and with a bit of an introduction to PostgreSQL, which though it is highly popular, somehow seems to be less talked about than its most direct “competitors” MongoDB and MySQL.

Introduction to PostgreSQL and recommendations - by Martijn Wallet, OptimaData

PostgreSQL is an advanced SQL database server, which is available on a wide range of platforms. It has an enviable reputation for performance, stability, and a wide range of advanced features, which have been developed over the course of more than 20 years. With that, PostgreSQL is one of the oldest open source projects in existence, completely free to use, and developed by a very diverse, worldwide community. And best of all, it just works!

One of its key benefits is that it is open source, meaning that customers and users have a very permissive license to install, use, and distribute PostgreSQL without paying anyone any fees or royalties. On top of that, PostgreSQL is well-known as a database that stays up for long periods, and requires little or no maintenance in many cases. As a result, PostgreSQL provides a very low total cost of ownership.

Originally developed by the Database Research Group at the University of California, Berkeley, PostgreSQL is now developed and maintained by a huge army of developers and contributors. Many of those contributors have full-time jobs related to PostgreSQL, working as designers, developers, database administrators, and trainers. Some, but not many, of those contributors work for companies that specialize in support for PostgreSQL. No single company owns PostgreSQL, nor are you required (or even encouraged) to register your usage. In other words, it is truly an open source project, in the best sense of the term.In the early days, when PostgreSQL was still a research database, the focus was solely on the cool new features. Over the last 15 years, enormous amounts of code have been rewritten and improved, giving us one of the most stable and largest software servers available for operational use.

PostgreSQL is a general-purpose database management system, which offers users many ways to work. You define the database that you would like to manage with it. You can use a normalized database model, augmented with features such as arrays and record subtypes, or use a fully dynamic schema with the help of JSONB and an extension named hstore. PostgreSQL also allows you to create your own server-side functions in any of a dozen different languages.

PostgreSQL is highly extensible, so you can add your own data types, operators, index types, and functional languages. You can even override different parts of the system using plugins to alter the execution of commands or add a new optimizer. All of these features offer a huge range of implementation options to software architects and many ways to keep out of trouble when building applications and maintaining them over long periods of time.

In my opinion for PostgreSQL the following features are key:

  • Excellent SQL standards compliance
  • Client-server architecture
  • Highly concurrent design where readers and writers don't block each other
  • Highly configurable and extensible for many types of applications
  • Excellent scalability and performance with extensive tuning features
  • Support for many kinds of data models: relational, document (JSON and XML), and key/value

What makes PostgreSQL different from other databases?

The PostgreSQL project focuses on the following objectives according to its website:

  • Robust, high-quality software with maintainable, well-commented code
  • Low maintenance administration for both embedded and enterprise use
  • Standards-compliant SQL, interoperability, and compatibility
  • Performance, security, and high availability

About PostgreSQL and MySQL

What surprises many people is that PostgreSQL's feature set is more comparable with Oracle or SQL Server than it is with MySQL. The only connection between MySQL and PostgreSQL is that these two projects are open source; apart from that, the features and philosophies are almost totally different.

One of the key features of Oracle, since Oracle 7, has been snapshot isolation, where readers don't block writers and writers don't block readers. You may be equally surprised to learn that PostgreSQL was the first database to be designed with this feature, and it offers a complete implementation. In PostgreSQL, this feature is called Multiversion Concurrency Control (MVCC).

Who is using PostgreSQL?

Prominent users include Adyen, Apple, BASF, Genentech, Heroku, IMDB. com, Skype, McAfee, NTT, The UK Met Office, and The U. S. National Weather Service. 5 years ago, PostgreSQL received well in excess of 1 million downloads per year, according to data submitted to the European Commission, which concluded that, "PostgreSQL is considered by many database users to be a credible alternative."

Main advantages of PostgreSQL

PostgreSQL offers many advantages for users and businesses over other database systems.

Immunity to over-deployment

Over-deployment is what some proprietary database vendors regard as their #1 licence compliance problem. With PostgreSQL, no-one can sue our customers for breaking licensing agreements, as there is no associated licensing cost for the software.

This has several additional advantages:

  • More profitable business models with wide-scale deployment
  • No possibility of being audited for license compliance at any stage
  • Flexibility to do concept research and trial deployments without needing to include additional licensing costs

Better support than the proprietary vendors

There is a vibrant community of PostgreSQL professionals and enthusiasts that users can interact with and get support from. OptimaData is also a good option :-)

Legendary reliability and stability

Unlike many proprietary databases, it is extremely common for companies to report that PostgreSQL has never, ever crashed for them in several years of high activity operation. Not even once. It just works.

Extensible

The source code is available to all at no charge. If users have a need to customise or extend PostgreSQL in any way then they are able to do so with a minimum of effort, and with no attached costs. This is complemented by the community of PostgreSQL professionals and enthusiasts around the globe that also actively extend PostgreSQL on a daily basis.

Cross platform

PostgreSQL is available for almost every brand of Unix (34 platforms with the latest stable release), and Windows compatibility is available via the Cygwin framework. Native Windows compatibility is also available with version 8.0 and above.

Designed for high volume environments

It is possible to make use of a multiple row data storage strategy called MVCC to make PostgreSQL extremely responsive in high volume environments. The leading proprietary database vendors use this technology as well, for the same reasons.

Why Severalnines and ClusterControl for PostgreSQL?

I’ve been following Severalnines a couple of years and along that way I discovered the maturity of their product, ClusterControl. All kinds of companies find their way to OptimaData, for example companies which are operating several database types that all need attending to.

For such companies ClusterControl is a very interesting solution to consider as it automates a lot of important tasks. But also at larger companies like VidaXL with a few dozen database nodes the automatic recovery features for clusters are a great enrichment for their database operations.

The newest additions in release 1.4.2 of ClusterControl for PostgreSQL are a great step forward. The automated failover handling is from my point of view a key feature and for me an important reason to advise ClusterControl to our customers. But also the deployment of an entire replication topology through the new wizard is good consideration. I have been using it a few times already and it’s a real advantage compared to other deployment methods. Also the monitoring has improved compared to earlier versions of ClusterControl.

Of course, there is always something more to wish for and I can’t wait to see what’s in the next release of ClusterControl.

For automation and management therefore, we recommend ClusterControl for PostgreSQL to customers and users for the following features:

  • ClusterControl for PostgreSQL
    • Manage All Your Servers From a Single Console
    • Automate Failover Handling
    • Stream Replication
    • Monitor performance
  • Streaming Replication
    • Easily deploy and setup master/slave replication setups
  • Performance Monitoring
    • Monitor queries and detect anomalies, built-in and custom advisors
  • Automated Day to Day Tasks
    • Manage configurations, schedule backups, encrypt client/server traffic
  • Configuration Management
    • Automatically manage and provision configurations for your servers
  • Automated Failover Handling
    • Detect master failures and automatically promote new master

And in addition to ClusterControl, we also like to recommend the following tools:

  • pgAdmin, a database management tool for database administrators;
  • pgAgent, job scheduling agent for the planning of complex tasks;
  • Repmgr, replication and failover manager for PostgreSQL server clusters;
  • pgBouncer, connection pooler for setting up high redundant environments;
  • Barman, Backup and Recovery Manager for the planning of backup and disaster recovery;
  • pgAudit, detailed session and/or object audit logging via the standard PostgreSQL logging facility;
  • PostGIS, provides spatial objects for the PostgreSQL database, allowing storage and query of information about location and mapping;
  • PgBadger, a fast PostgreSQL log analysis report;
  • PgWatch2, flexible self-contained PostgreSQL metrics monitoring/dashboarding solution.

Additional useful links

GUI database design and administration tools

There are many high-quality GUI Tools available for PostgreSQL from both open source developers and commercial providers. A list is available on the wiki that functions as a community guide to PostgreSQL GUI Tools.

Technical Features

Please see the Feature Matrix for a summary of PostgreSQL's features

One last tidbit of information I’d like to share: when PostgreSQL was first developed, it was named Postgres, and therefore many aspects of the project still refer to the word "postgres"; for example, the default database is named postgres, and the software is frequently installed using the postgres user ID. As a result, people shorten the name PostgreSQL to simply Postgres, and in many cases use the two names interchangeably. And for those you hesitate:

PostgreSQL is pronounced as "post-grez-q-l". Postgres is pronounced as "post-grez."

We hope you enjoyed the read! If you have any questions or comments, do share them in the comments box below. We’ve referred to postgresql.org (thank you) for some of the content in this blog.

Viewing all 195 articles
Browse latest View live